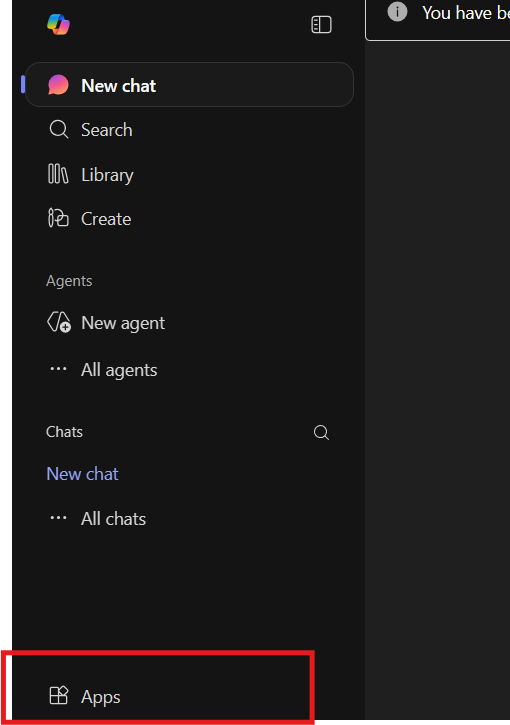
Public: IT Knowledge
- Windows
- Windows: Remote Access
- Task Manager: How to force close an application
- Control Panel: Recognizing Microphone Input
- Windows: Restarting your machine
- Windows: Selecting Output Audio Device
- Windows: Tools for Productivity
- Windows: How to reset/Add a PIN
- Windows: Projecting Screen via Display Cables
- Windows: Device Name
- Windows: Connecting Via Bluetooth
- Windows: Adding a Printer in Windows
- Windows: Time and Date Settings
- Windows: Configuring Power settings
- Windows | Accessing a shared drive
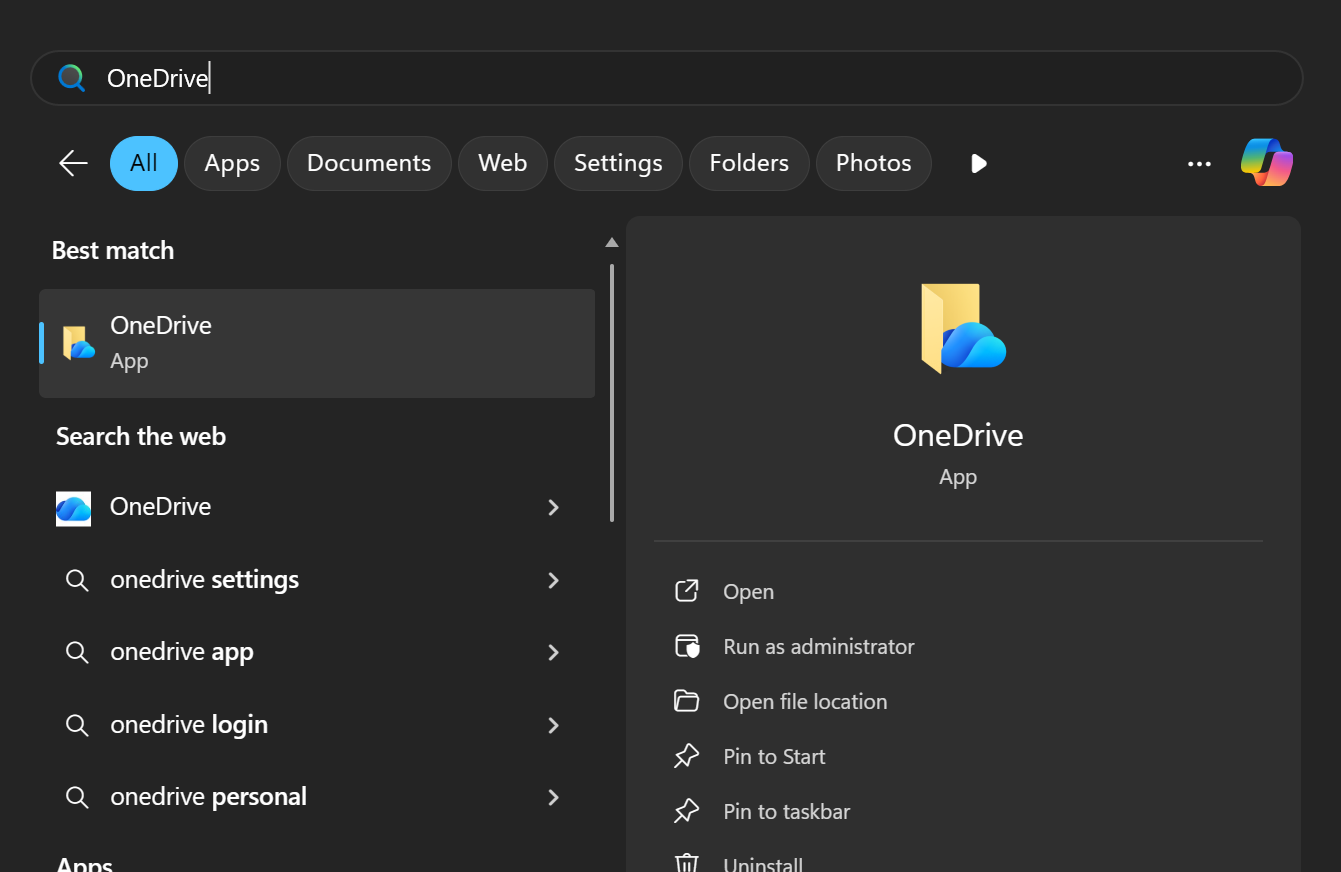
- Microsoft 365 (OneDrive, Sharepoint, Outlook... etc)
- Microsoft 365: How to set up the Microsoft Authenticator app
- Microsoft 365: Setting up Two Factor Authentication (iPhone)
- Microsoft 365: SharePoint: SharePoint Via Network Drive
- OneDrive: OneDrive Syncing problems
- Outlook
- Outlook: Adding a Shared Mailbox (Outlook Web App + New Outlook)
- Outlook: Opening a Mailbox (Outlook Web App + New Outlook)
- Outlook: How to Add a Shared Mailbox (Classic Outlook)
- Outlook: How to Set Up an Email Account on Outlook for Android
- Outlook: How to encrypt Email Attachments using 7-ZIP
- Outlook: Adding a new Mailbox (iPhone)
- Outlook: Signature Images not showing.
- Outlook: Send from another mailbox
- Outlook: Setting up Out of Office Message (Classical Outlook)
- Outlook | Logging into Outlook
- Ticketing System
- How to raise a Ticket with 9 Technology Group LTD
- How to raise a Ticket with 9 Technology Group LTD (Superops)
- Office
- Hardware
- Networking
- Security
- VPN & Remoting
- Browsers
- 3CX IP Phone
- 3CX: Configuring Ports on Your 3CX Server Using nftables
- 3CX: Setting Up 3CX on Mobile
- 3CX: How to view Recordings & Voicemails
- SMART ID Printer
- Next Cloud
Windows
Pages relating to Windows Computers,
Windows: Remote Access
Quick Assist: Your Built-In Solution for Remote IT Support
Quick Assist is a Windows built-in remote software that enables IT support engineers to quickly connect to your machine and resolve IT issues remotely. Setting it up is simple and takes just a minute. Follow these easy steps:
1. Open the Start Menu
Press the Windows key on your keyboard to bring up the Start Menu.
2. Search for Quick Assist
Type Quick Assist in the search bar, then press Enter to open it.

3. Enter the Support Code
Once the Quick Assist window appears, you’ll see a prompt asking for a code. Your IT support engineer will provide this code.
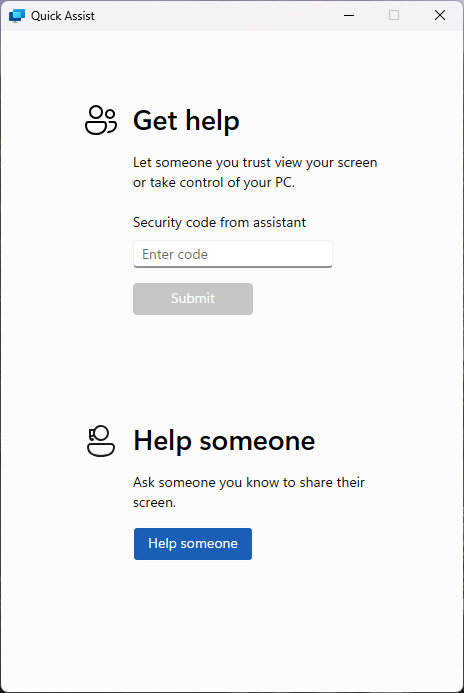
4. Submit the Code
Type in the code and click Submit to initiate the remote session.

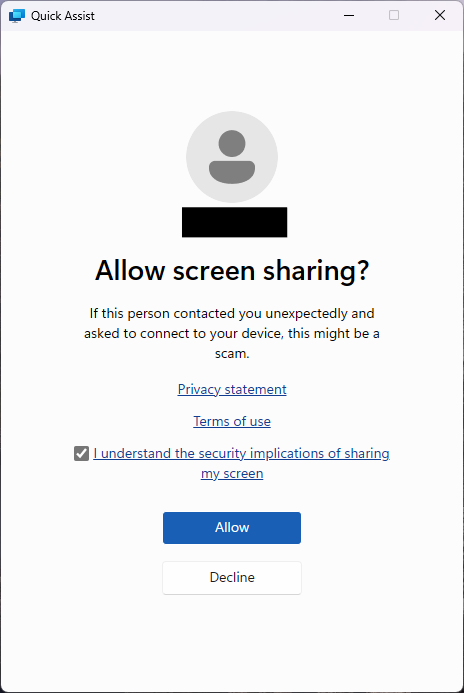
5. Accept the Remote Session
Quick Assist will go through a brief loading screen, followed by a prompt with a checkbox. Tick the box and click Accept to confirm the remote session.
6. Grant Control to the Support Engineer
Finally, your support engineer will request control of your machine. A toolbar will appear at the top of your screen. Click Allow to grant them control.

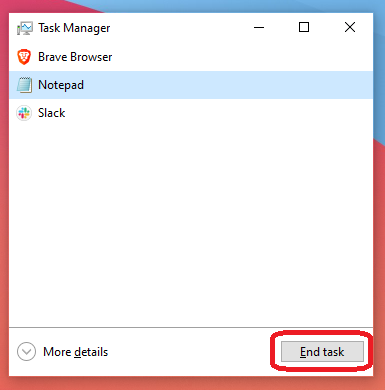
Task Manager: How to force close an application
Welcome to this quick guide on how to force close a crashed or frozen application. If an app suddenly stops responding, it can feel frustrating and leave you unsure of what to do. Crashes often occur when an application encounters issues accessing your computer’s processes. Force closing the unresponsive app and reopening it can often resolve the problem and get things running smoothly again
1. Open the Start Menu
Press the Windows key on your keyboard to bring up the Start Menu.
2. Search for Task Manager
Type Task Manager in the search bar, then press Enter to open it.

3. Find the application
Once the Task Manager window appears, you’ll see a series of application currently running on your machine. Find the application that is in question and Select it.

4. End Task
Click End Task. This will force a close to the application.
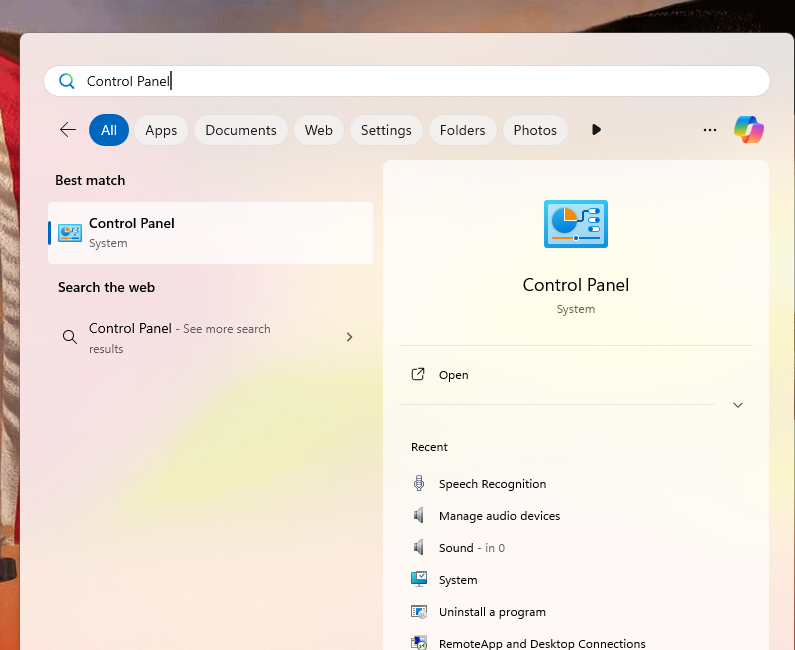
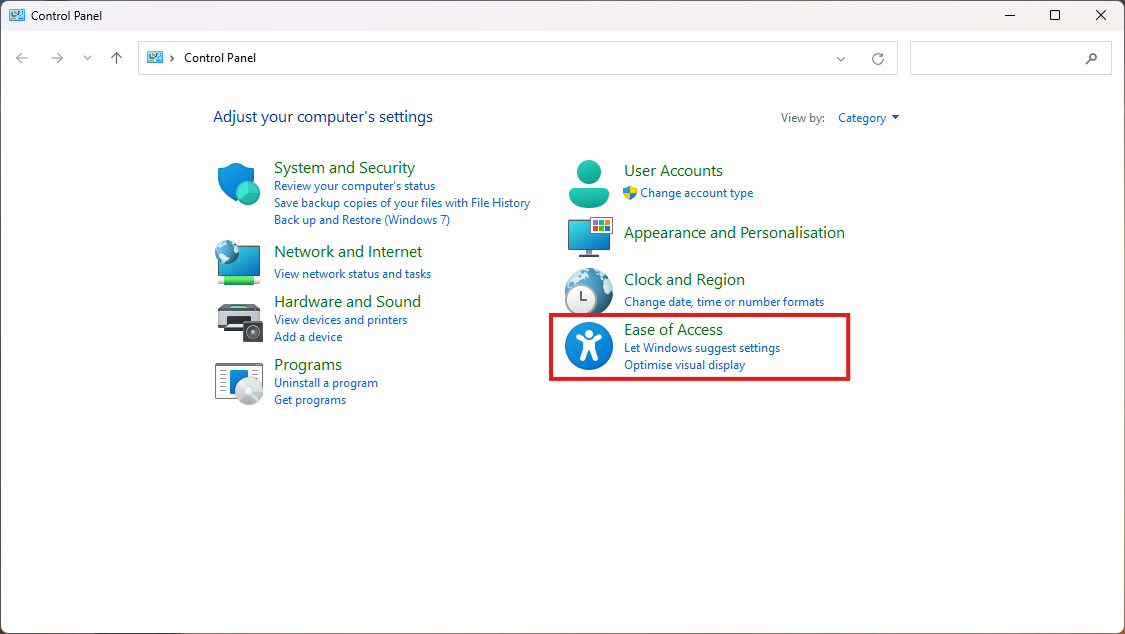
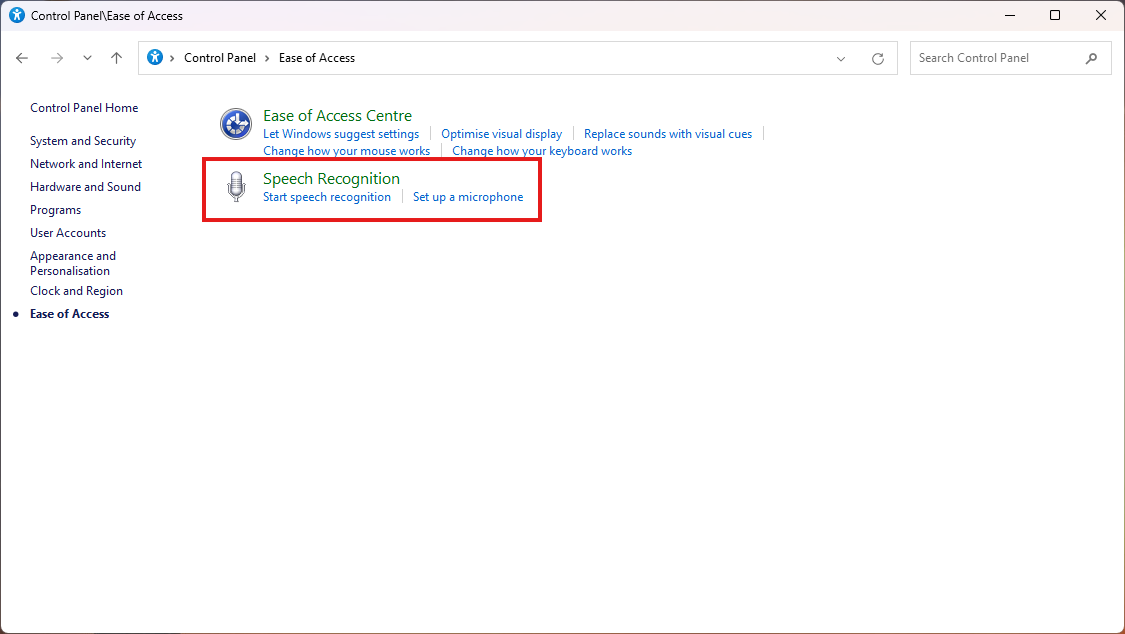
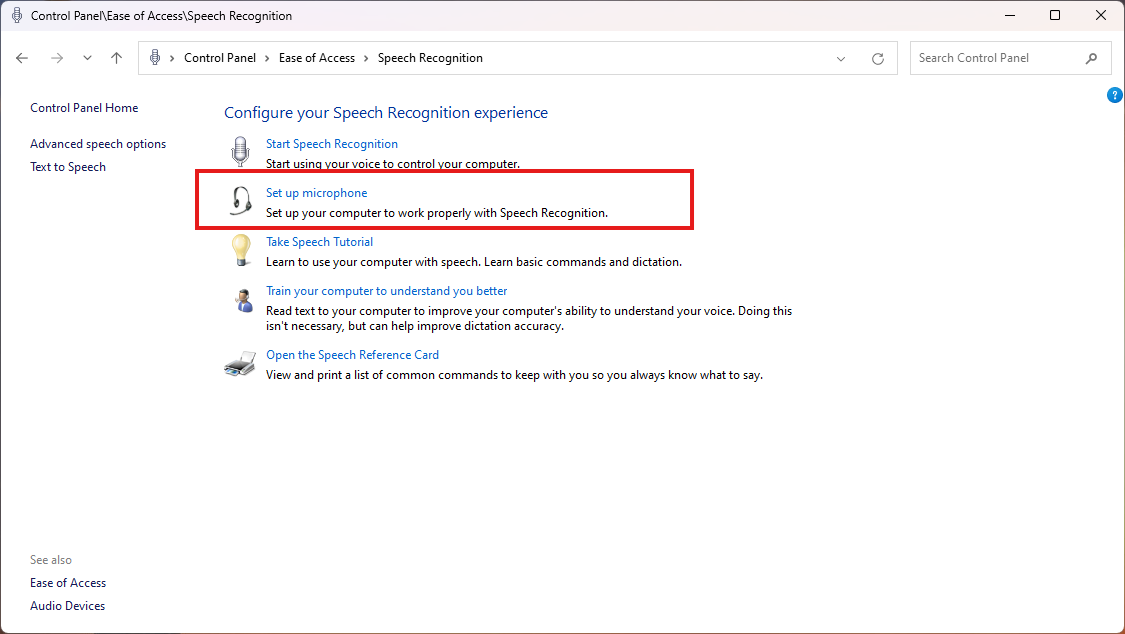
Control Panel: Recognizing Microphone Input
What will be covered:
- How to test if my microphone is working.
1. Open the Start Menu
Press the Windows key on your keyboard to bring up the Start Menu.
2. Search for Control Panel
Type Control Panel in the search bar, then press Enter to open it.
3. Open Ease of Access Tab
Once Control Panel has opened, Locate the Ease of access tab.
4. Open Speech Recognition
Click "Speech Recognition"
5. Set up Microphone
Click "Set up Microphone"
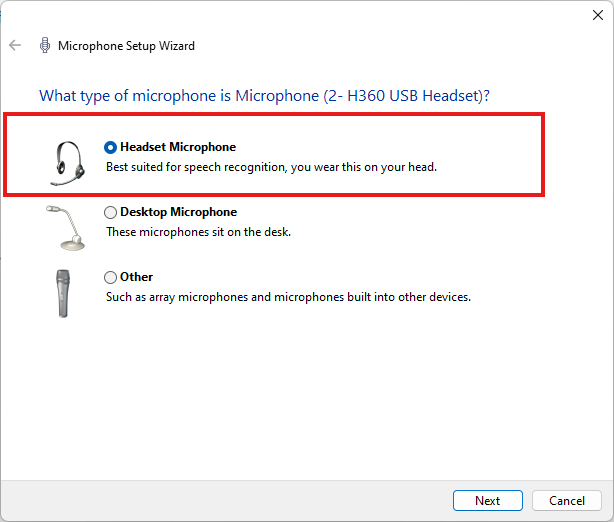
6. Microphone Device
Windows will auto-detect the microphone you have connected to the computer. Select the relevant Microphone device.
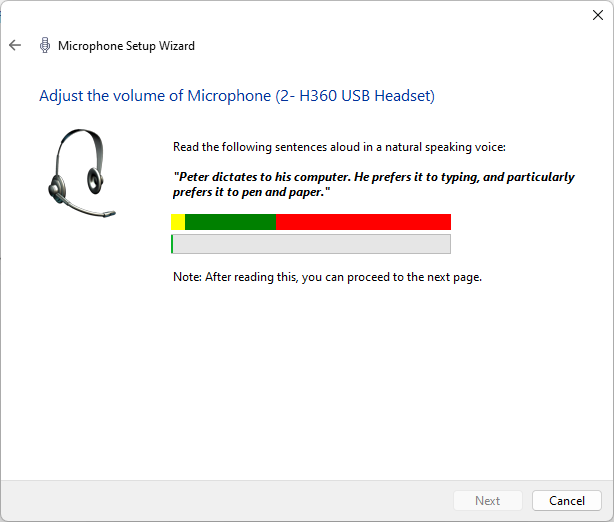
7. Test Audio Input
Now test the microphone. the sound level bar should go up and down based on your voice frequency picked up by the microphone. Red: Too loud, Green: Good Sound Level, Yellow: Quite. If you aren't any getting audio input the sound level would stay still at the bottom.
Windows: Restarting your machine
Here’s how to reboot your Windows machine in a few simple steps. Windows 11 and 10 and generally the same.
1. Open the Start Menu
Press the Windows key on your keyboard to bring up the Start Menu.
2. Select Power Options
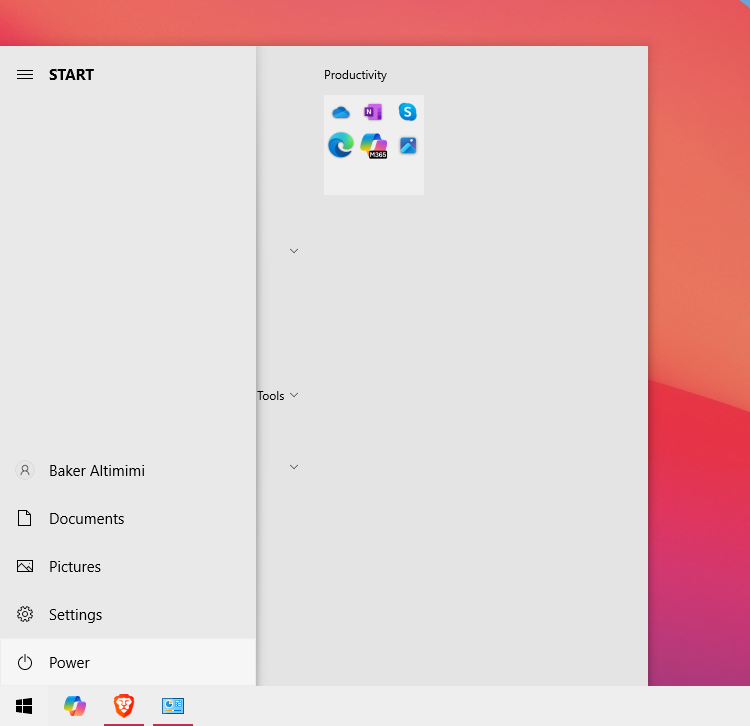
3. Choose Restart
Click on Restart. Your computer will close all programs, log off, and reboot automatically.
4. Confirm and Save Work
If prompted, make sure to save any unsaved work before proceeding, as restarting will close open applications.
Benefits of Rebooting Over Shutting Down
Restarting a computer offers some unique advantages over shutting down. When you restart, the system clears temporary files and cache, freeing up system memory. This often resolves minor glitches, refreshes processes, and optimizes performance. Importantly, rebooting also completes pending updates. Updates often require a reboot to fully install changes, improving system security and stability. Unlike a complete shutdown, which does not necessarily initiate updates, restarting ensures that patches, driver updates, and other system improvements are applied.
Thanks for reading this Article, if you are still experiencing issues and nothing has been resolved then please contact the support team.
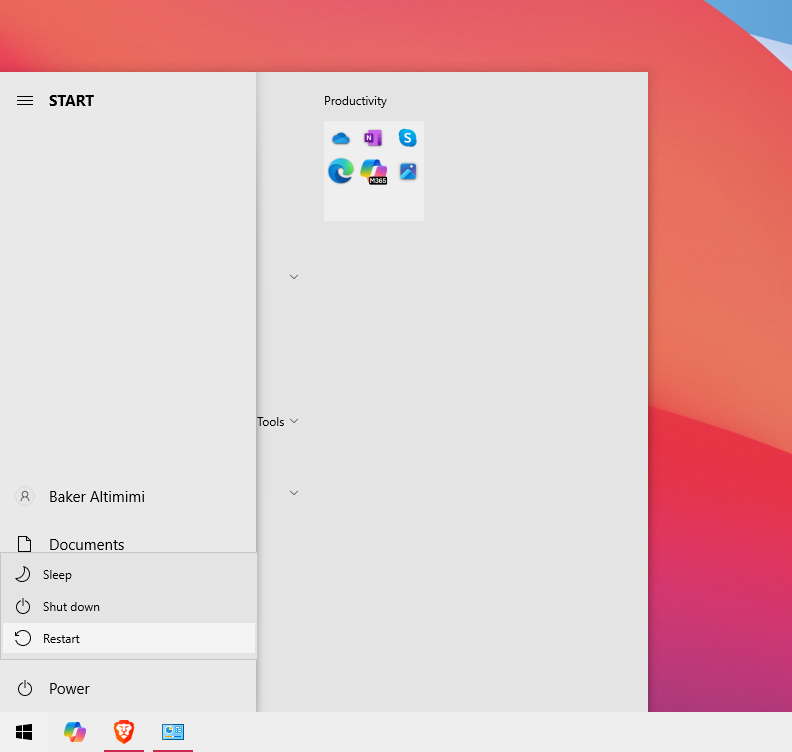
Windows: Selecting Output Audio Device
What will be covered:
- How to Select the appropriate audio output device
Reason: One reason to select the right output device is Windows might of auto-selected the wrong output device and now the audio is being outputted from your monitor instead of the headphones.
1. Open Quick Panel
Locate the quick panel at the bottom right of your screen and open it.

2. Open Sound Output Menu
Click the "Sound Output menu."

3. Select & Test
Whatever Windows has recognized of sound output devices will be displayed under the Output device. Select the appropriate output device so that audio can be outputted to that device instead of another.
Windows: Tools for Productivity
This article covers different application which are pre-built into Windows to help you to be extra productive when you are working.
1. Snipping Tool
Snipping tool is helpful in allowing you to take snippets of your screen. In Windows 11 it also provides a recording feature. After a snippet has been taken you will automatically have it saved on your clipboard. This allows you to quickly paste the snippet anywhere you'd like. You can use the Windows key + Shift + S to quickly open the snippet tool.
Where to find:
- Windows key + S to open the windows search box
- Type Snipping Tool.

How to use:
- Begin a new snippet.
- Toggle between Screenshot or Recording ( Windows 10 only always for screenshot).
- Toggle between how you would like to take a snippet. e.g Cutting with window toggled, will give you a screenshot of whatever window you selected.
- Add Delay to give you enough time to take a screenshot.
- Quickly Modify the screenshot.
- Crop or Convert whatever text is seen in the screenshot into copiable text.
- Other features
2. Sticky Notes
Sticky notes is a valuable tool which allows you to take notes on the fly. Notes are automatically saved and you can keep creating sticky notes as much as you want.
Where to find:
- Windows key + S to open the windows search box
- Type Sticky Note.
- You might need to sign into a Microsoft account (in that case you can use your outlook email address).

How to use:
- Add another sticky Note
- Settings - Includes customizing background colour.
- Tool bar - including adding an image and text customization.
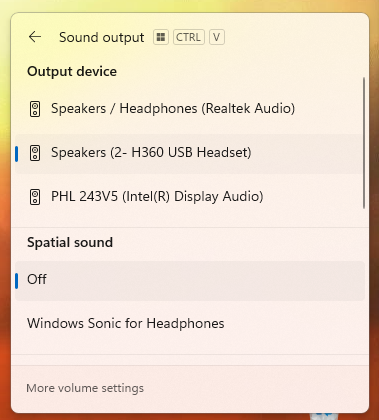
3. Paint
Paint is a handy tool to quickly editing images. copy and paste images in the canvas and start using the tools at the top to edit the image.
Where to find:
- Windows key + S to open the windows search box
- Type Paint.
4. Photos
An alternative way to browser your pictures saved on your machine. Photos also allows you to connect to OneDrive or iCloud photos.
Where to find:
- Windows key + S to open the windows search box
- Type Photos.
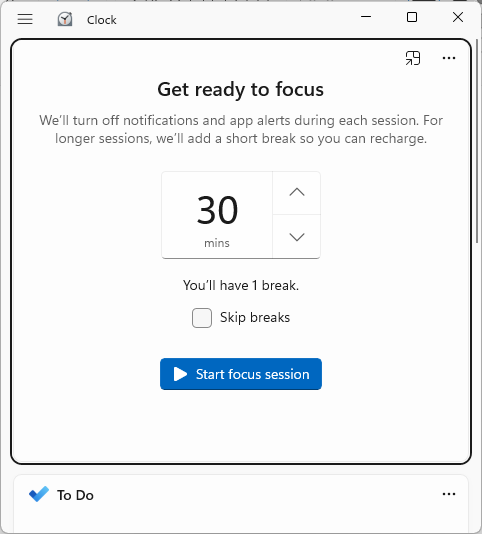
5. Clock
The clock application is great tool to keep focus. You can set a timer and a break time to ensure you are focused when you are using your machine.
Where to find:
- Windows key + S to open the windows search box
- Type Clock.
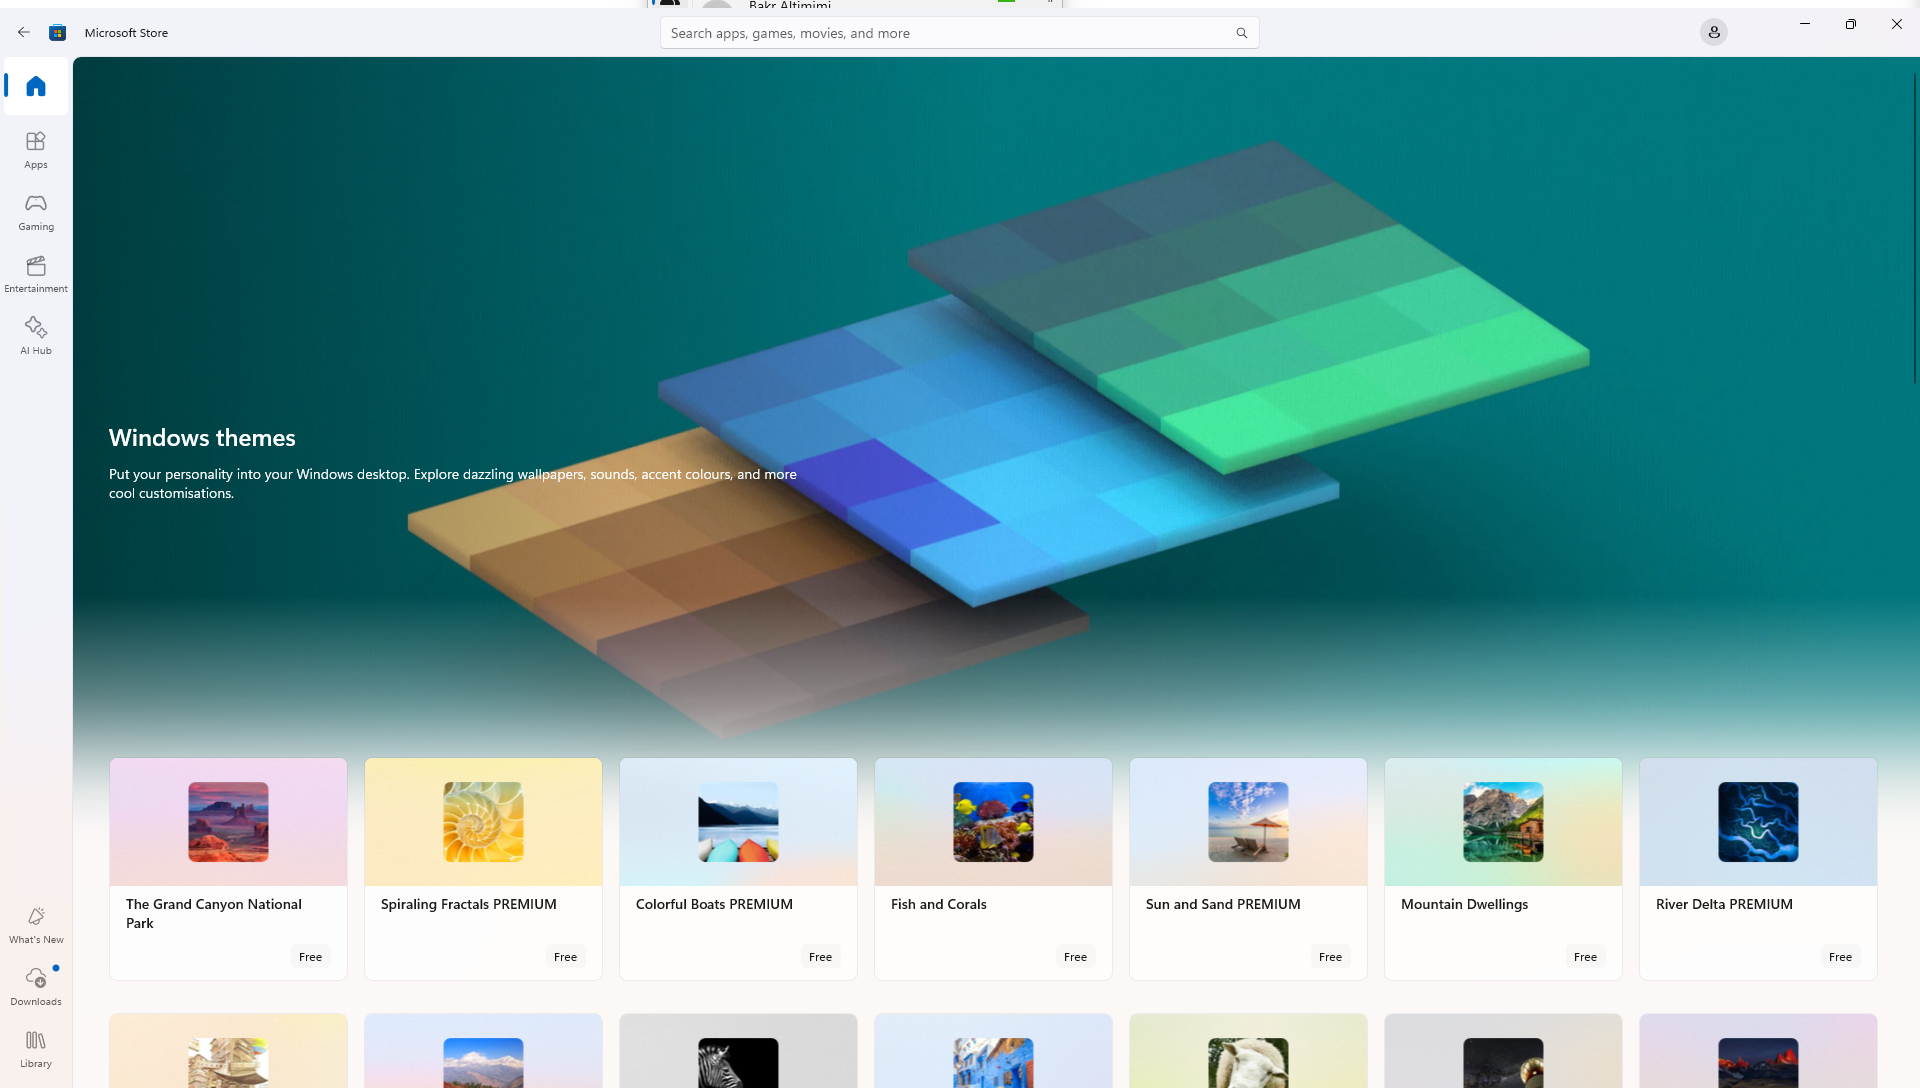
6. Microsoft Store
Similar to the app store or apple store, Microsoft store is a safe way to install applications. You can install applications like Whatsapp, Facebook...etc.
Where to find:
- Windows key + S to open the windows search box
- Type Microsoft Store.
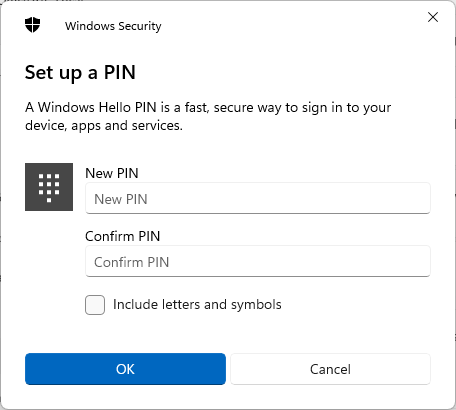
Windows: How to reset/Add a PIN
This article goes through resetting/ Adding a PIN for Windows 10/ 11
1. Open the Start Menu
Press the Windows key on your keyboard to bring up the Start Menu. search for Settings.
2. Open Accounts Tab
Inside the accounts tab find sign-options.
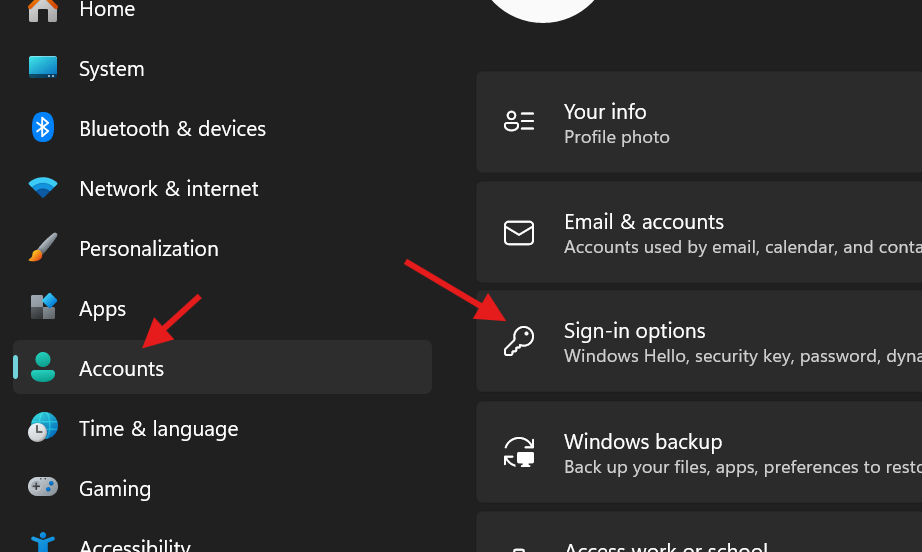
3. PIN (Windows Hello)
Click "Set up" and enter your Password. If you are resetting a PIN then click "forgot PIN".

4. Enter a PIN
Finally enter a PIN and OK when you are done.
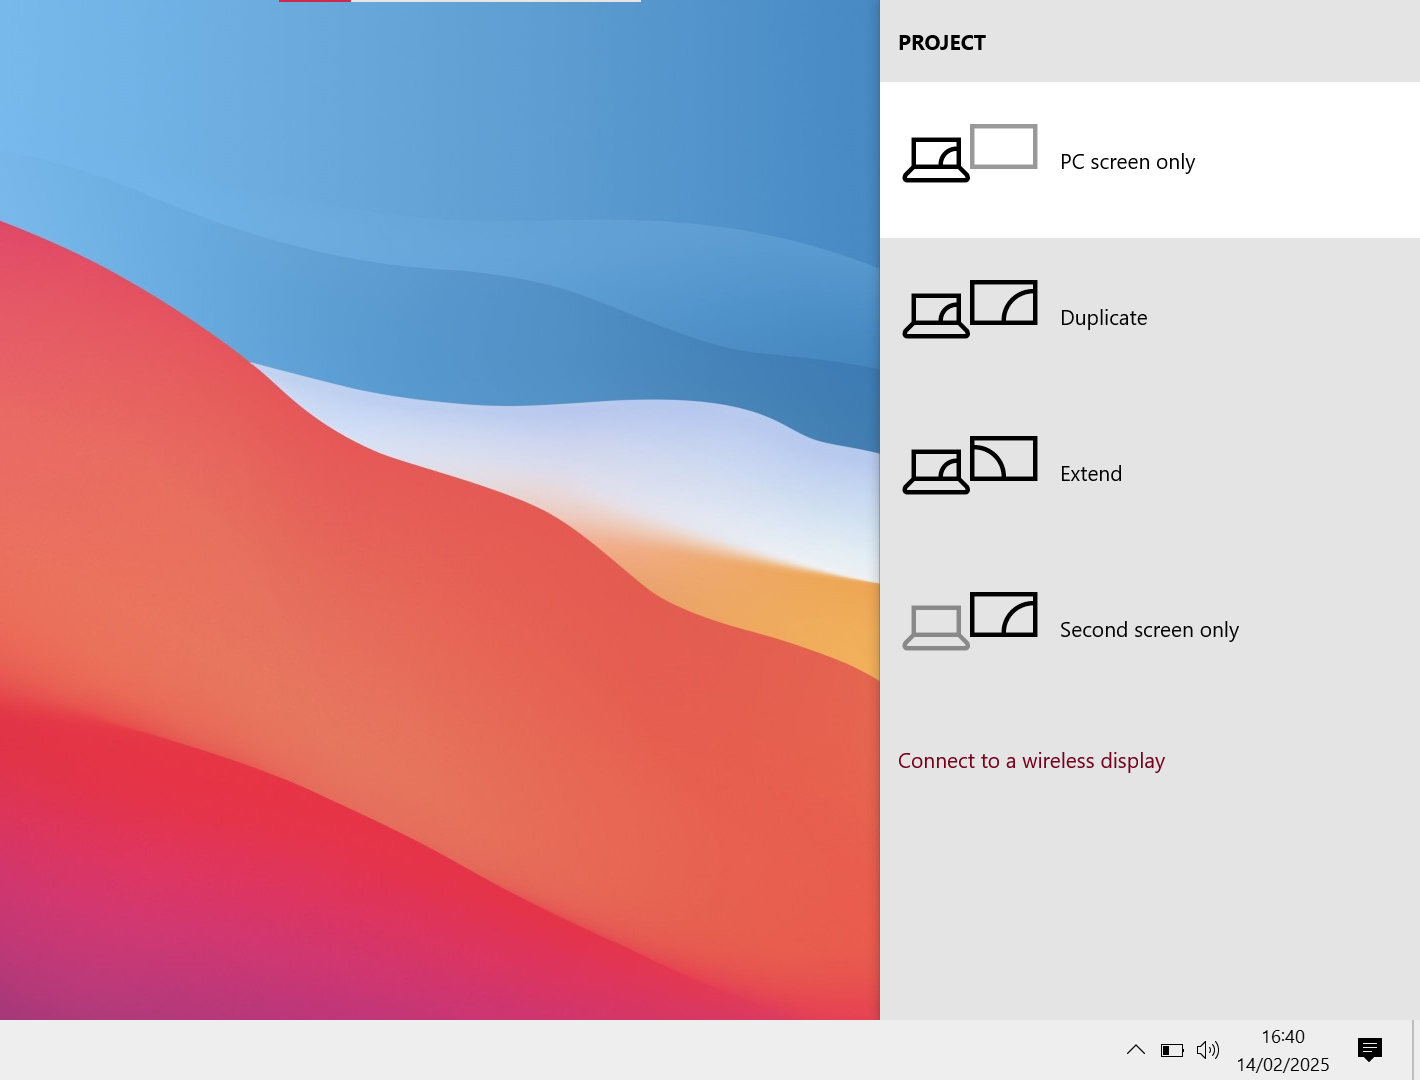
Windows: Projecting Screen via Display Cables
Devices which support a display connection allows you to project your laptop screen to a larger screen. Provided that you have already setup, this article demonstrates how to configure projection via Windows.
1. Adjusting Projection style
Press the Windows key + P. A series of different projecting styles should pop up.
PC screen only = This stops the projection to the Secondary screen but keeps your screen working.
Duplicate = Whatever is seen on the PC screen will exactly display on the Secondary screen.
Extend = Whatever is seen on the PC screen is kept on the PC screen. Secondary screen is an extension of the PC screen but not duplicate.
Second screen Only = This Keeps the projection to the Secondary screen but stops your screen displaying.
Depending on your needs you can adjust the style.
2. Display Settings
1. You can drag the boxes which corresponds to the Monitors you have connected. This might come in handy if you are dragging your mouse to the wrong Connor of the screen to access the other monitor screen.
2. Identify shows a number on each screen. This helps you to identify which monitor needs moving to the correct order.
3. Select a screen (Box) which isn't currently the main screen then select " Make this my main display". Handy if you want make a monitor the central monitor for you work.

Windows: Device Name
What will be covered:
- How to display your machine's details.
1. Open the Start Menu
Press the Windows key on your keyboard to bring up the Start Menu and Type "About"
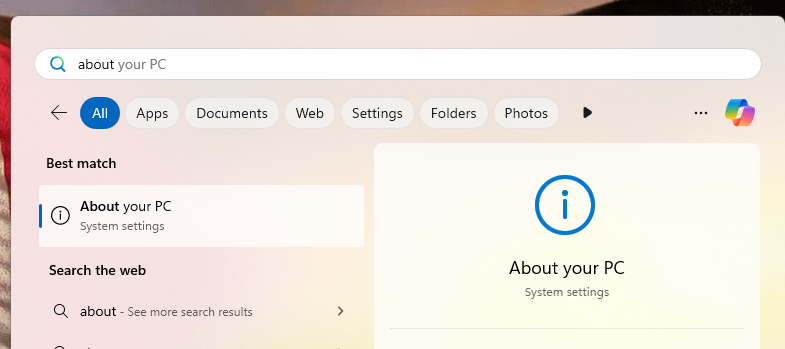
2. System Information
The System information can be helpful for the IT Team to identify your machine.

Windows: Connecting Via Bluetooth
Windows: Adding a Printer in Windows
What will be covered:
- How to add a printer
1. Open the Settings menu
Press the Windows key on your keyboard to bring up the Start Menu. Type settings in the search bar.
2. Open the Bluetooth & devices section
Look for the Bluetooth icon on the middle left of the screen.
3. Open Printers & Scanners
Select Printers & Scanners in the list of options.
4. Click Add Device
Windows will automatically search the network for available printers. Most of the times this might fail due to drivers not being installed. Depending on the printer you are trying to connect, search the printer model and name on google to install the drivers. after they have been installed re-add the printer. Make sure you are on the same network as your printer.

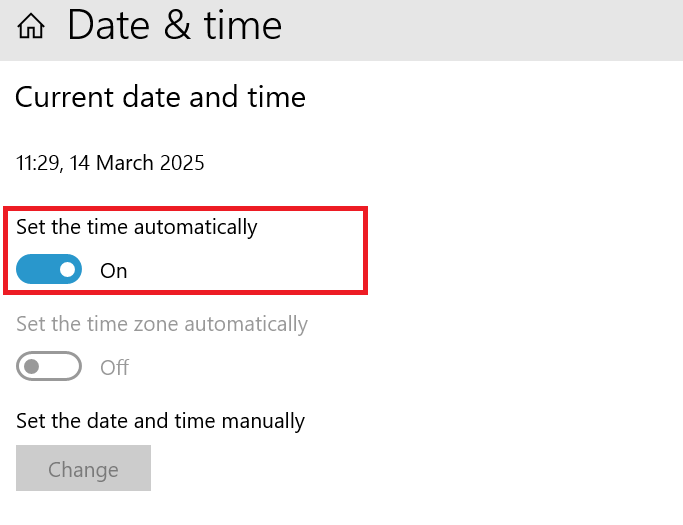
Windows: Time and Date Settings
Ensuring the right time and date on the systems can fix a lot of issues. If you are experiencing an issue on a specific application, this could be the potential fix. We will cover a how to set the computer to atomically configure the correct time always.
1. Adjust date/time
On the taskbar below the screen, right click the time and date. This will open a similar menu as in the image below. Click "adjust date/time".
2. Set the time automatically
Simply check on the toggle for "set the time automatically". This will automatically set the right time and date every-time the computer is turned on.
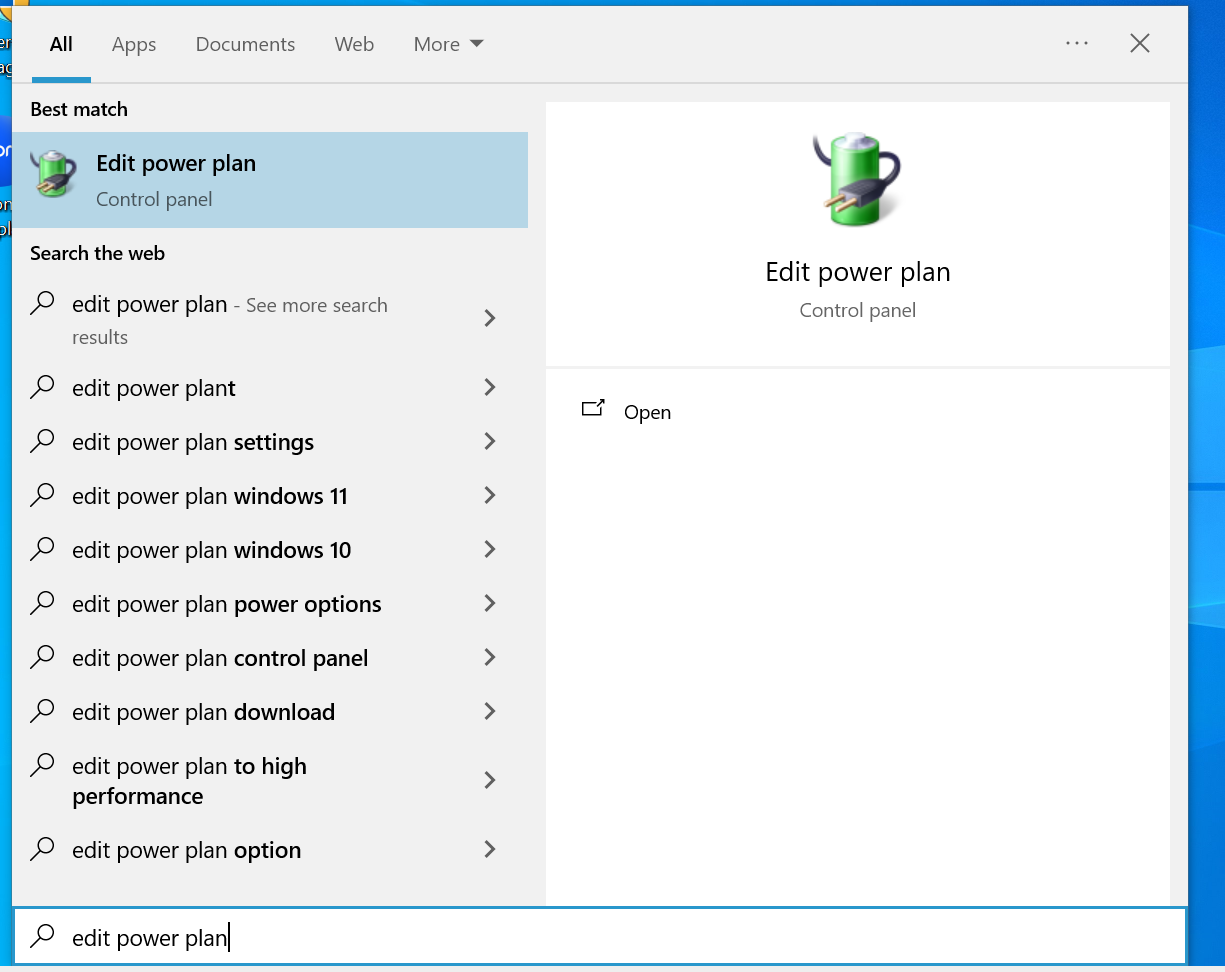
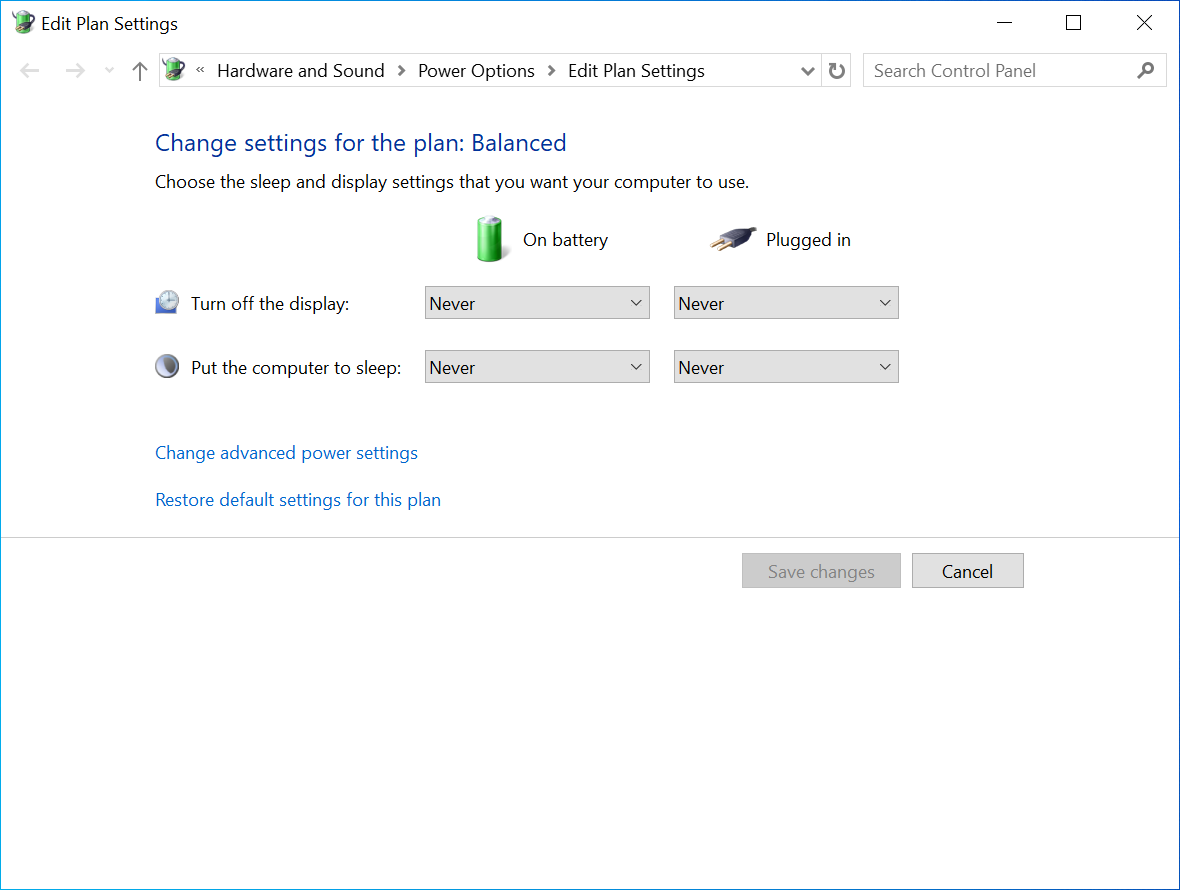
Windows: Configuring Power settings
Managing your Windows power plan settings allows you to control when your computer sleeps and when the monitor turns off. By customizing these settings, you can optimize power usage, improve system performance, and prevent unnecessary interruptions.
1. Open the Start Menu
Press the Windows key on your keyboard to bring up the Start Menu. Search for "Edit Power Plan"
2. Edit Plan Settings
Use the drop down menu to select when the screen display turns off or put the computer to sleep.
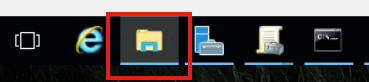
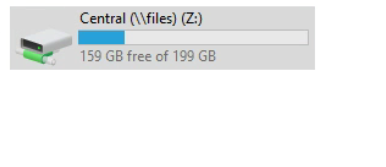
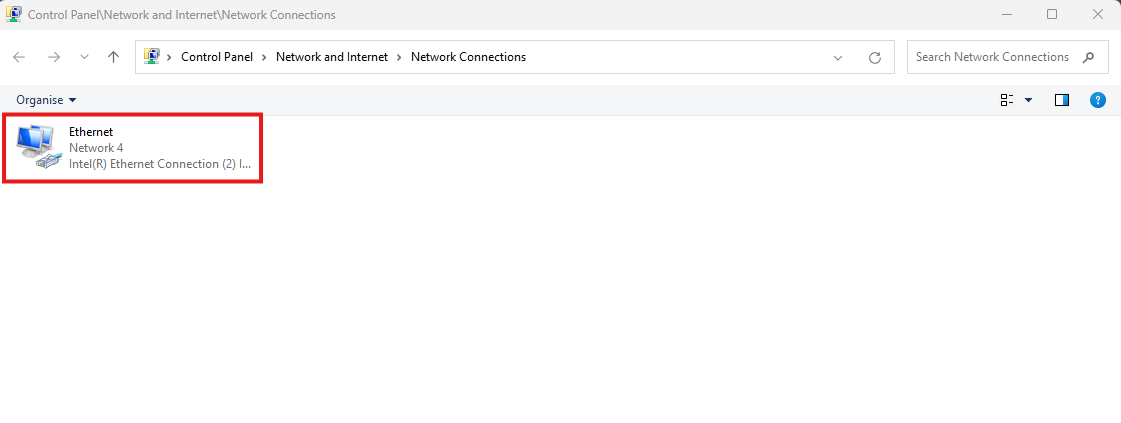
Windows | Accessing a shared drive
1. Open file explorer
2. Click "This PC"
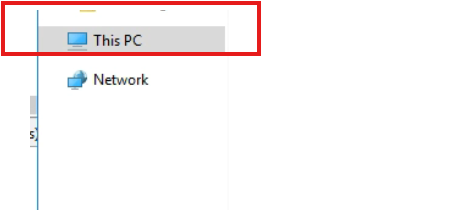
3. Click the Shared Drive.
Microsoft 365 (OneDrive, Sharepoint, Outlook... etc)
Articles regarding Microsoft 365 issues
Microsoft 365: How to set up the Microsoft Authenticator app
1. Open the Start Menu
Press the Windows key on your keyboard to bring up the Start Menu.
2. Search for Quick Assist
Type Quick Assist in the search bar, then press Enter to open it.
3. Enter the Support Code
Once the Quick Assist window appears, you’ll see a prompt asking for a code. Your IT support engineer will provide this code.
4. Submit the Code
Type in the code and click Submit to initiate the remote session.
5. Accept the Remote Session
Quick Assist will go through a brief loading screen, followed by a prompt with a checkbox. Tick the box and click Accept to confirm the remote session.
6. Grant Control to the Support Engineer
Finally, your support engineer will request control of your machine. A toolbar will appear at the top of your screen. Click Allow to grant them control.
Microsoft 365: Setting up Two Factor Authentication (iPhone)
Step 1
The “Authenticator” app should now appear on your home screen. You will need this for step 3.


Step 2
1. Using your computer, open a browser and navigate to https://login.microsoftonline.com.
2. Log into Office 365 online with your company email address and password. Eg: zak@support9.com.
Your IT Administrator will have already enabled 2FA on your Work Microsoft user account, so you should receive the prompt shown below asking you to setup 2FA (Two Factor Authentication).


3. You will then arrive on the Additional Security Verification page, asking you which security method you would like to use.
4. Select the Mobile app option from the drop-down list and select Use verification code from the list of choices, then Click Set up.
Once this has been completed you will be displayed with the message below.

Step 3
1. Now, open the Microsoft Authenticator app on your phone
2. Skip any Introduction screens the app may present, until the Ready to add your first account? screen or similar appears.
3. Select Add account or "+" icon on the top right corner of the app screen.
4. Select the Work or school account option

5. You may be asked to allow the app to use your phone’s camera, click OK to allow this.
You will be presented with a screen called Scan QR code with a square camera box in the middle of the screen.

6. Lift the mobile device so that the QR code on your computer screen sits inside the Scan QR code camera square.

7. As soon as the Authenticator app has scanned the QR code the following screen will appear on the computer screen. Set up button is greyed out and the Next button is highlighted.
On the Authenticator app on your mobile phone a new account will have been created, displaying 6-digit number that updates every 30 seconds. This ever-changing number provides the second authentication factor required for 2FA.
8. Click Next on your computer screen.
9. You will then be prompted for the 6-digit verification code from the Authenticator app.

10. Enter the six-digit code displayed on your mobile phone Authenticator app and click Verify.

11. Select the country from the drop-down list and then enter your mobile telephone number. Click Next.
Thanks for reading this Article, if you are still experiencing issues and nothing has been resolved then please contact the support team.
Microsoft 365: SharePoint: SharePoint Via Network Drive
1) Open your web browser Chrome, Edge..etc
2) Search “www.Office.com” in the URL bar at the top (Search bar)
3) Top Right, Click “Sign in” *if you already not signed in
4) Top Left, Click on the 3x3 gird
5) Choose “SharePoint”
6) Find the SharePoint Site that has the files and folders. A SharePoint site is a centralized storage space for all/selected staff users to access files and folders*
7) Once you are inside the site, Click “Documents”.
8) Copy the URL from the URL address bar. Do not copy the entire URL, only copy to https://name-of-you-domain.Sharepoint.com
Part 2 Internet Options
1) Open Internet options, Click Windows key + S
2) Type “ Internet options”
3) Inside Internet options, Select the Security tab at the top.
4) Click on “Trusted Sites”
5) Click on “Sites” Underneath “Trusted Sites”
6) Paste the URL address inside the “Add this website…” Field.
7) Click “Add”, then close.
Part 3 Microsoft Edge
We will need to configure edge to allow the old internet explore to access that URL address or else the network drive will not work.
1) Open Microsoft Edge,
2) Click on the three dots at the top.
3) Click on “Settings”
4) On the left of the screen, Select “Default Browser”
5) Ensure “Allow sites to be reloaded…” is set to allow.
6) Go back to the SharePoint site from part 1, and copy the link again but this time add the additional information.
7) Go back to Edge, Underneath Allow , Click on “Add”
8) Paste again the URL address.
9) Click on “Add”.
10) In the search bar of edge, paste the same URL Link
1 11) Sign into your Microsoft account
12) If you see the below image then you have done it correct.
Part 3 Network Map
1 1) Open File Explorer, Click Window key + S
2) Type “File Explorer”
3) Right Click “This PC”
4) Paste in the URL address once more in the folder field. Optionally you can choose the Drive Letter.
5) Click Finish and the SharePoint site Document should appear like a Network Drive.
OneDrive: OneDrive Syncing problems
The Article demonstrates how to quit & Re-open OneDrive in-case of any syncing issues.
✔ This often clears stuck sync queues without restarting the whole PC.
1. Right-click the OneDrive cloud icon
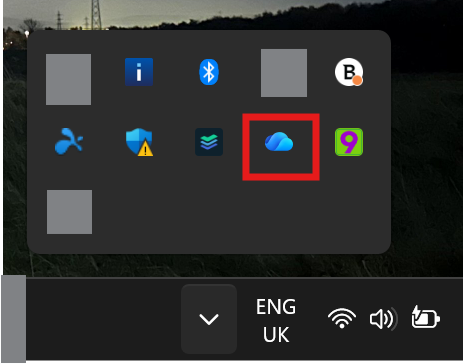
2. Click Quit OneDrive
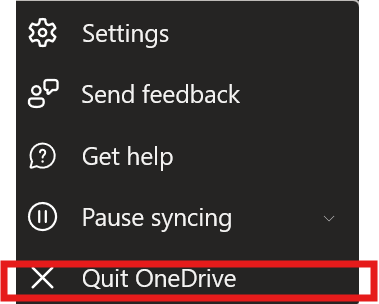
3. Start it again
-
Press Windows Key
-
Type OneDrive
-
Open it
Outlook
Articles relating Outlook Troubleshooting
Outlook: Adding a Shared Mailbox (Outlook Web App + New Outlook)
What will be covered:
- How to open a shared mailbox
- How to set a shared folder / Mailbox
1. Open Outlook Web App
Navigate to the Office 365 portal (https://outlook.office365.com) and log in with your credentials.
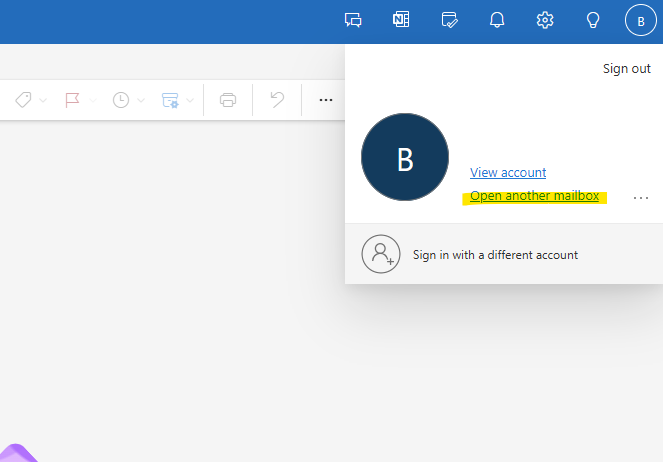
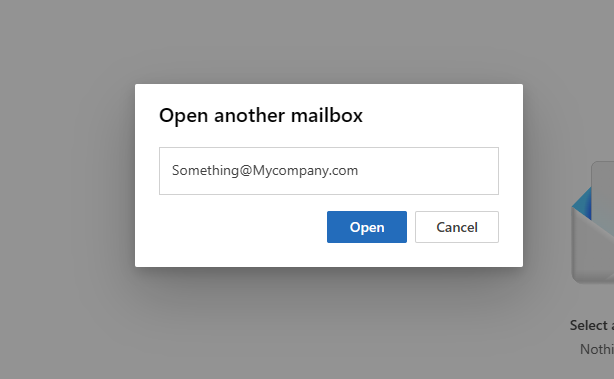
2. Open Shared Mailbox
Click on your profile picture or initials in the top-right corner, Select Open another mailbox. Lastly Enter the email address of the shared mailbox and click Open. The shared mailbox will open in a new tab.
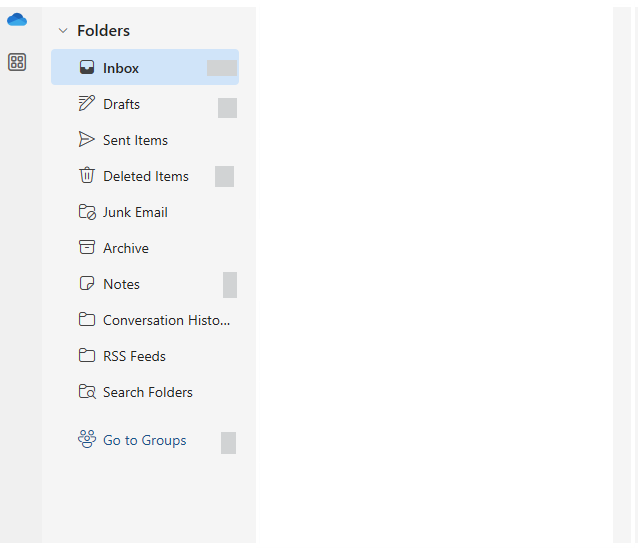
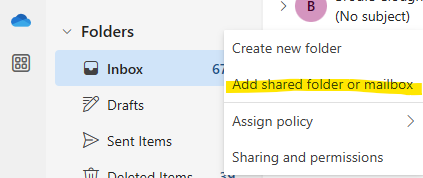
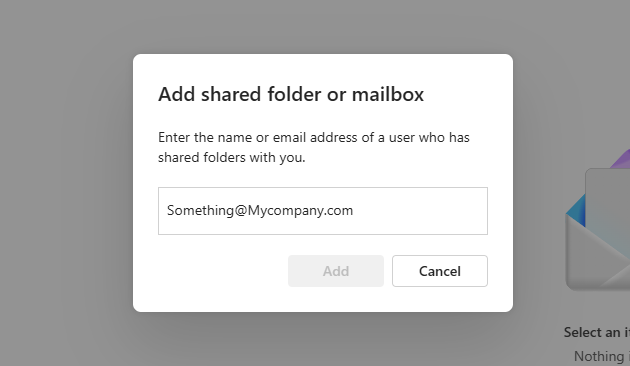
3. Add Shared Mailbox to Folder List
Right-click Folders in the left navigation pane. Right click the Folders and Select Add shared folder. Enter the email address of the shared mailbox and click Add.
Outlook: Opening a Mailbox (Outlook Web App + New Outlook)
What will be covered:
- How to open a mailbox
1. Open Outlook Web App
Navigate to the Office 365 portal (https://outlook.office365.com) and log in with your credentials.
2. Open Shared Mailbox
Click on your profile picture or initials in the top-right corner, Select Open another mailbox. Lastly Enter the email address of the shared mailbox and click Open. The shared mailbox will open in a new tab.
Outlook: How to Add a Shared Mailbox (Classic Outlook)
What will be covered:
- How to open a shared mailbox on Classic Outlook
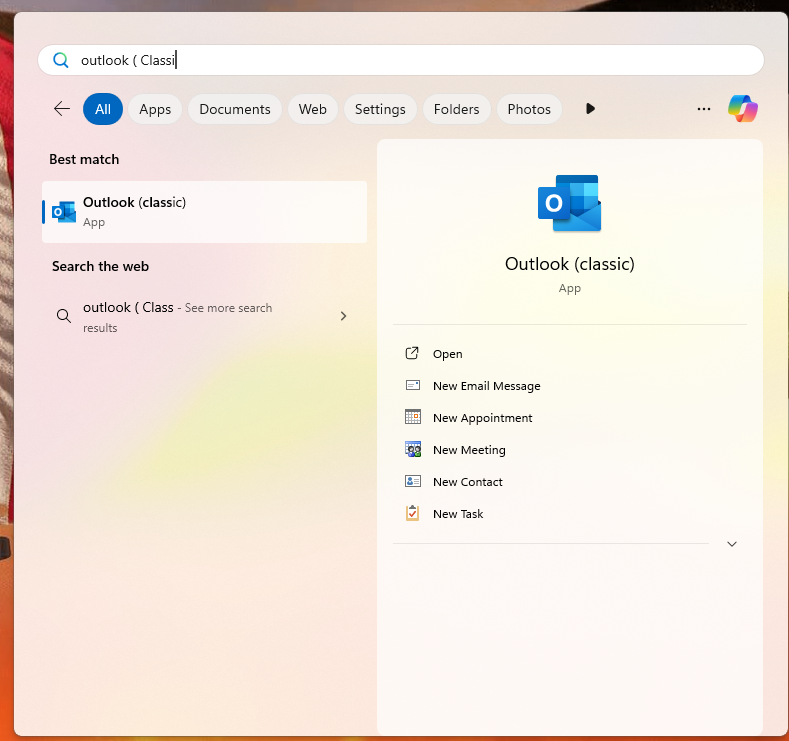
1. Open Outlook app (Classic)
Press the Windows key on your keyboard to bring up the Start Menu, Search Outlook.
2. Outlook Settings
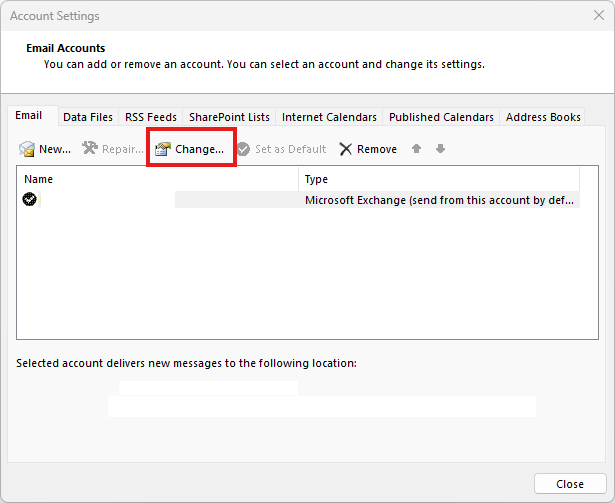
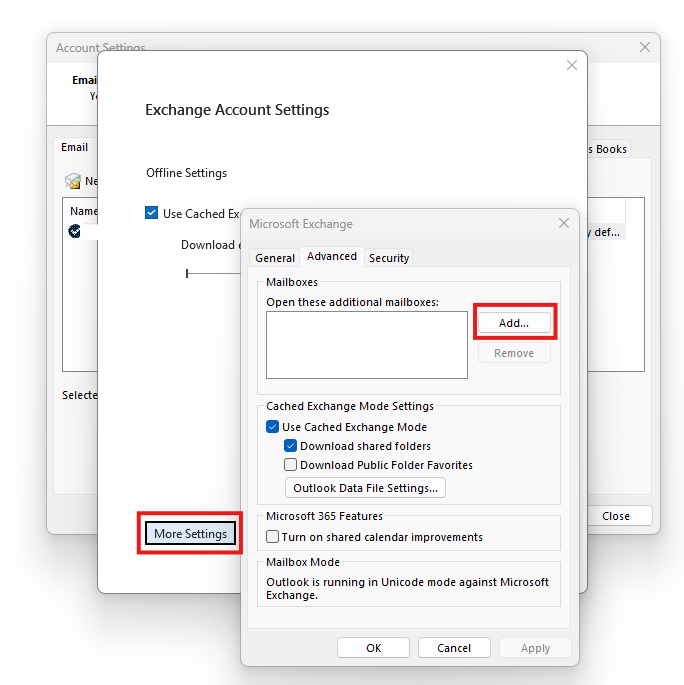
Select the File tab on the ribbon (top left), then select Account Settings > Account Settings.
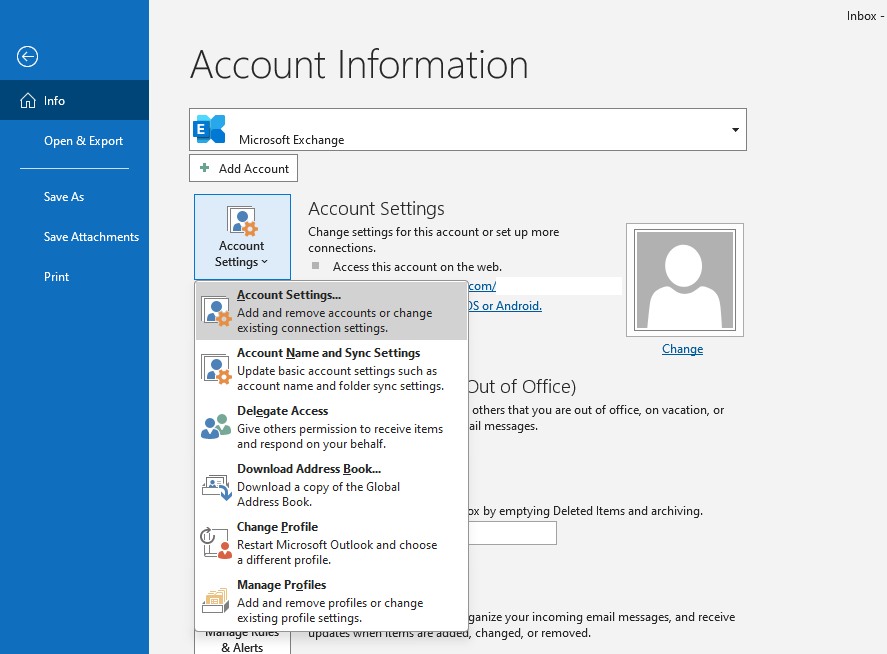
3. Account Settings
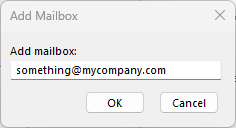
Select the Email tab. Make sure the correct account is highlighted, then choose Change. Choose More Settings > Advanced > Add. Type the shared email address, such as info@contoso.com. Choose OK > OK. Choose Next > Finish > Close.
Outlook: How to Set Up an Email Account on Outlook for Android
Follow these steps to download Outlook on your Android phone and set up your email account.
1. Download the Outlook App
Instructions: Open the Google Play Store on your Android device.

Action: Tap on the Microsoft Outlook app and then tap Install.
2. Open the Outlook App
Instructions: Once Outlook is installed, tap Open to launch it.

3. Get Started with Outlook
Instructions: When Outlook opens for the first time, tap Get Started.

4. Add Your Email Address
Instructions: Enter your email address in the provided field and tap Continue.

5. Enter Your Password
Instructions: You’ll be prompted to enter your email password. Type in your password and tap Sign In.
6. Approve Permissions (if prompted)
Instructions: Outlook may ask for permissions to access your contacts, calendar, or files. Tap Allow for any permission prompts.
7. Choose Notification Settings
Instructions: You’ll be asked how you want Outlook to notify you. Select All, Focused only, or None, based on your preference.
8. Finish Setup
Instructions: Tap Skip or Continue to finalize the setup (based on your preferences for additional accounts or tutorial).

9. Verify Account Setup
Instructions: Your inbox should now display. If you see your emails, the setup is complete!
Thanks for reading this Article, if you are still experiencing issues and nothing has been resolved then please contact the support team.
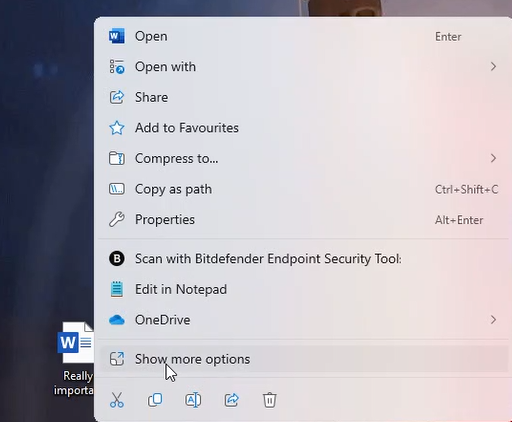
Outlook: How to encrypt Email Attachments using 7-ZIP
1. Right Click document
Find and right click the file you would like to encrypt. After right click find the "show more options" button and click it.
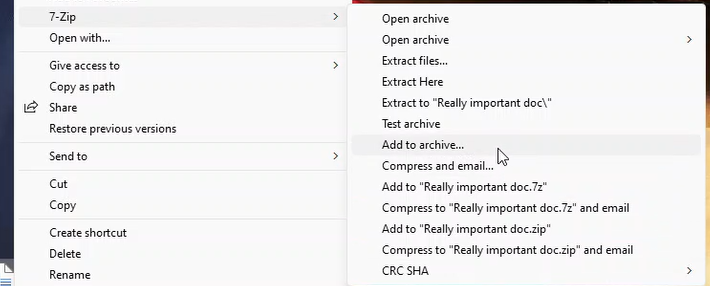
2. Add to archive
More options should appear, find the 7-zip option. In the sub-section of 7-zip select add to archive.
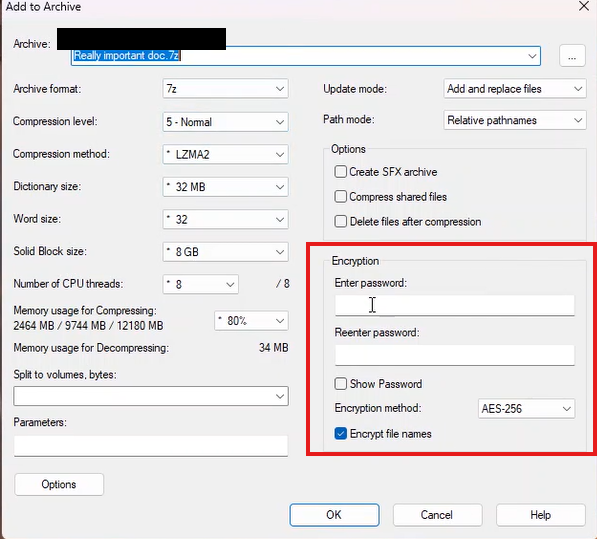
3. Enter a password for encrypting
Under the Encryption section, enter a password. This password will be used by the recipient to decrypt the file.
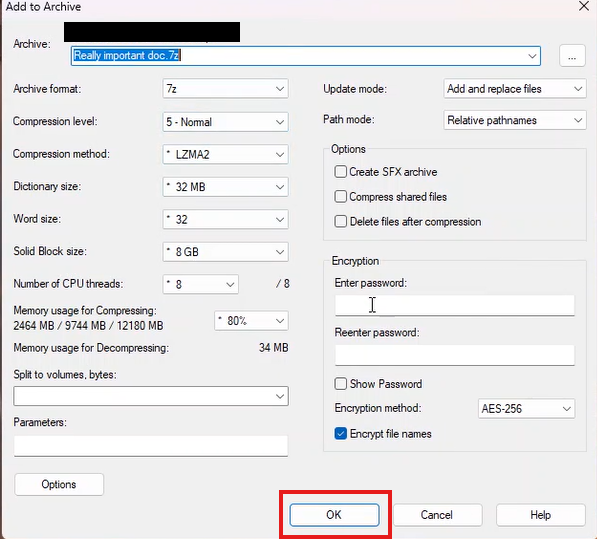
4. Click Ok
Click "OK" to finish the encrypting process
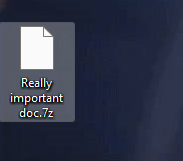
5. Transfer file
Finally we got our file encrypted, we can send this file as an attachment via outlook email. Make sure you send the file ending with .7z not the actual unencrypted .docs file. The recipient must also have 7-zip installed to open the file and decrypt.
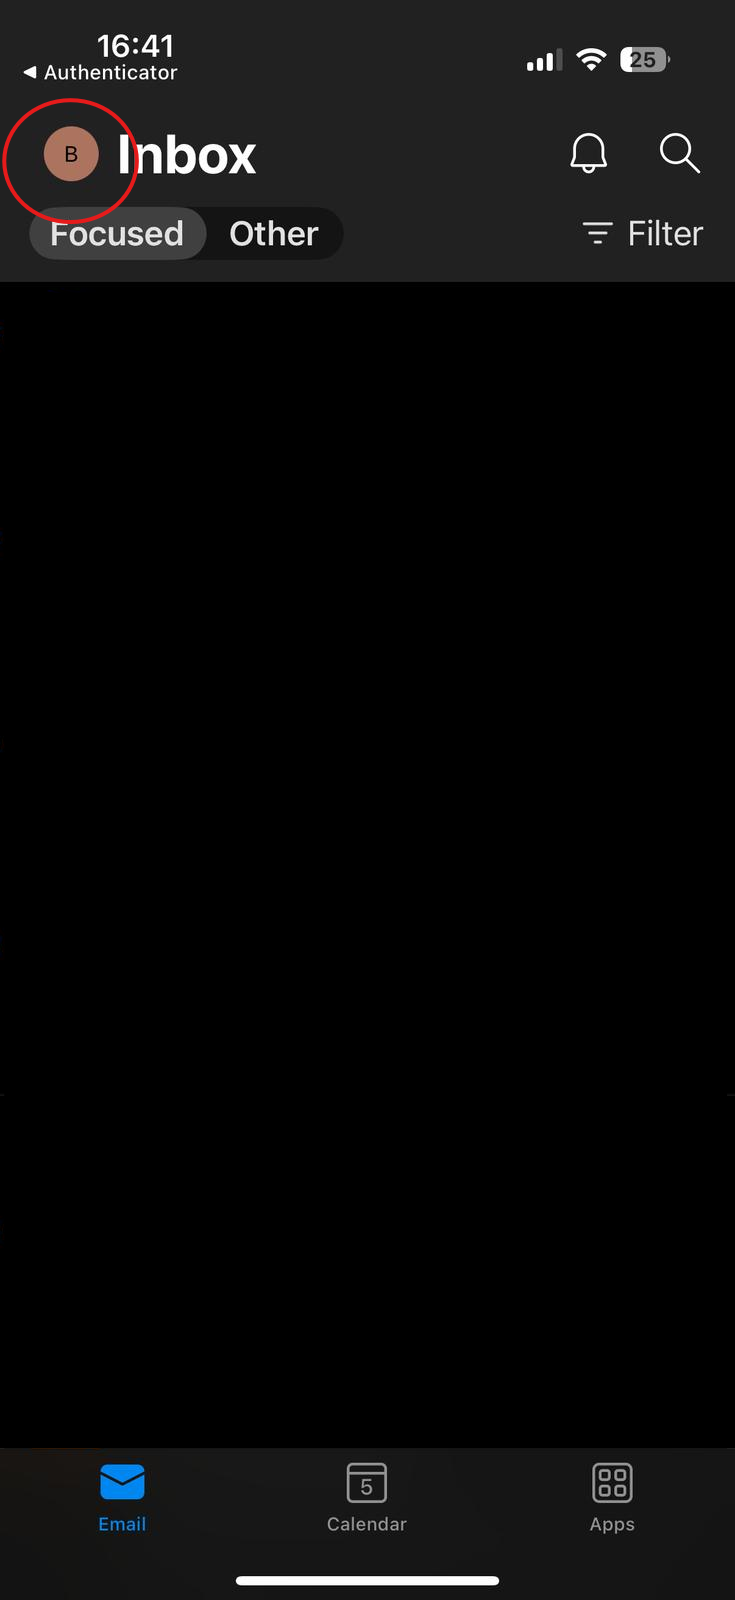
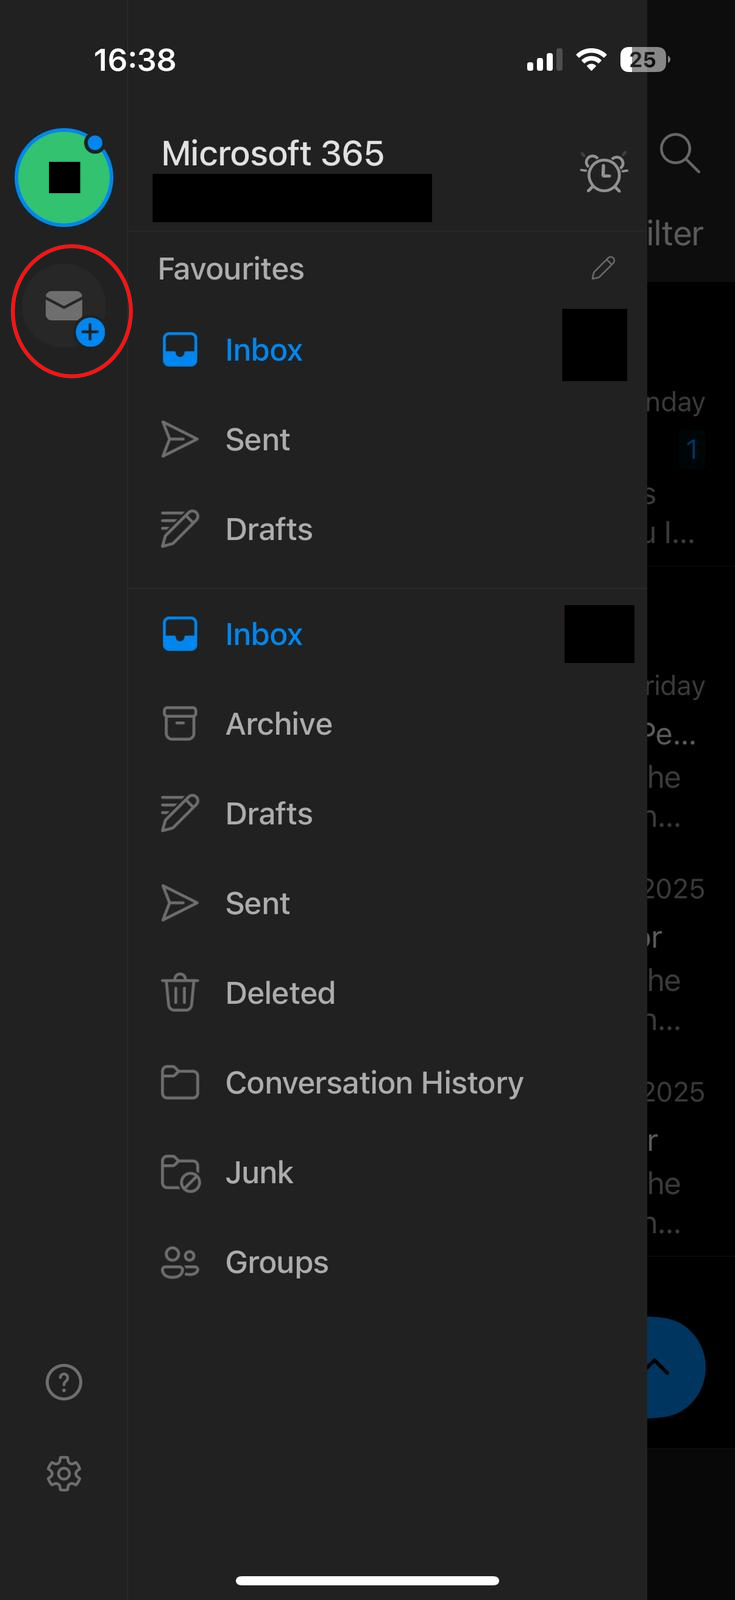
Outlook: Adding a new Mailbox (iPhone)
1. Open Outlook App
On your iPhone open the outlook app. Click your profile icon top left of the screen.
2. Add New Email Account
As highlighted below, click the add email button.
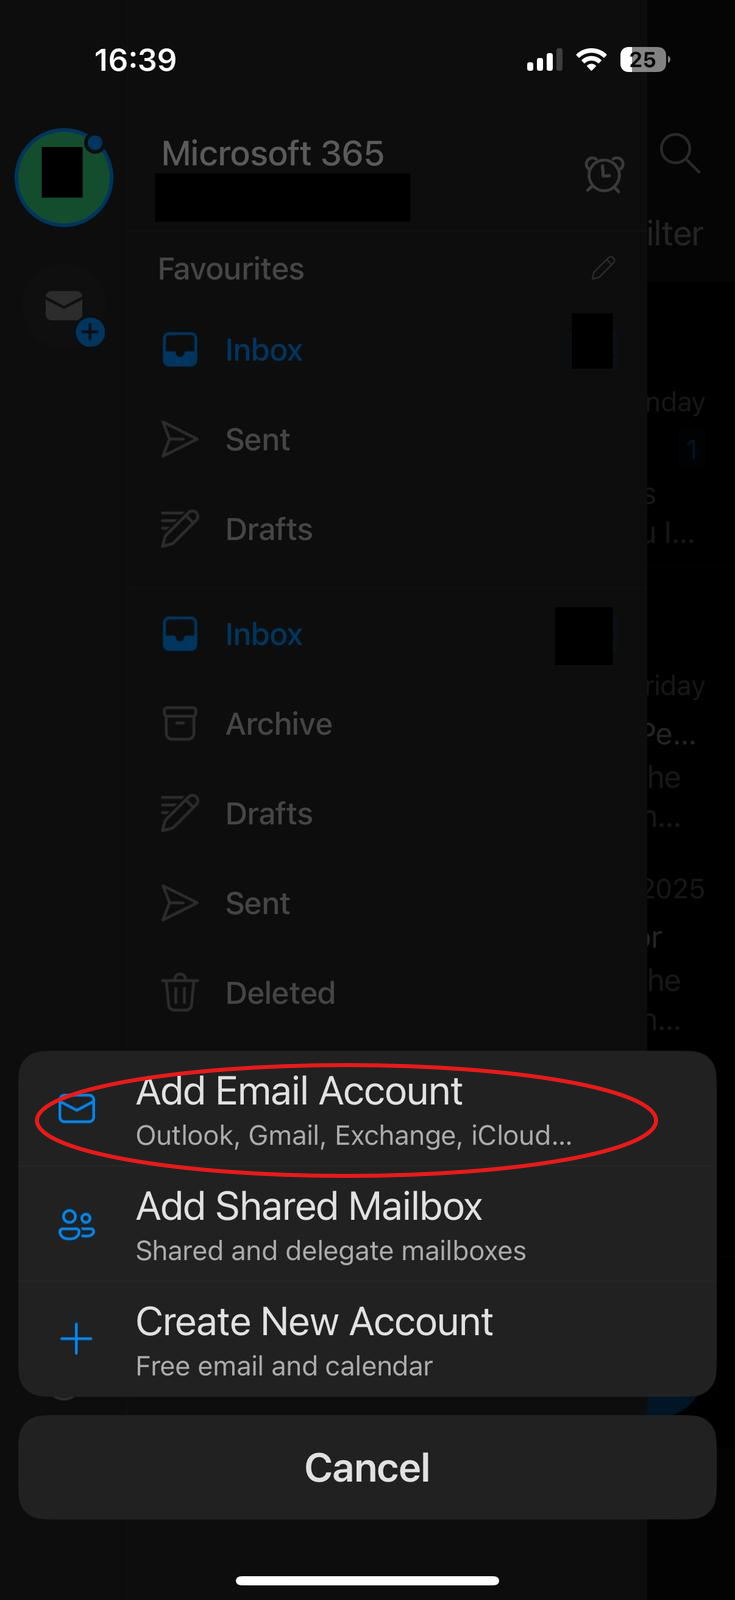
3. Login in
Enter in your email address. It might require MFA if that account has MFA enabled.

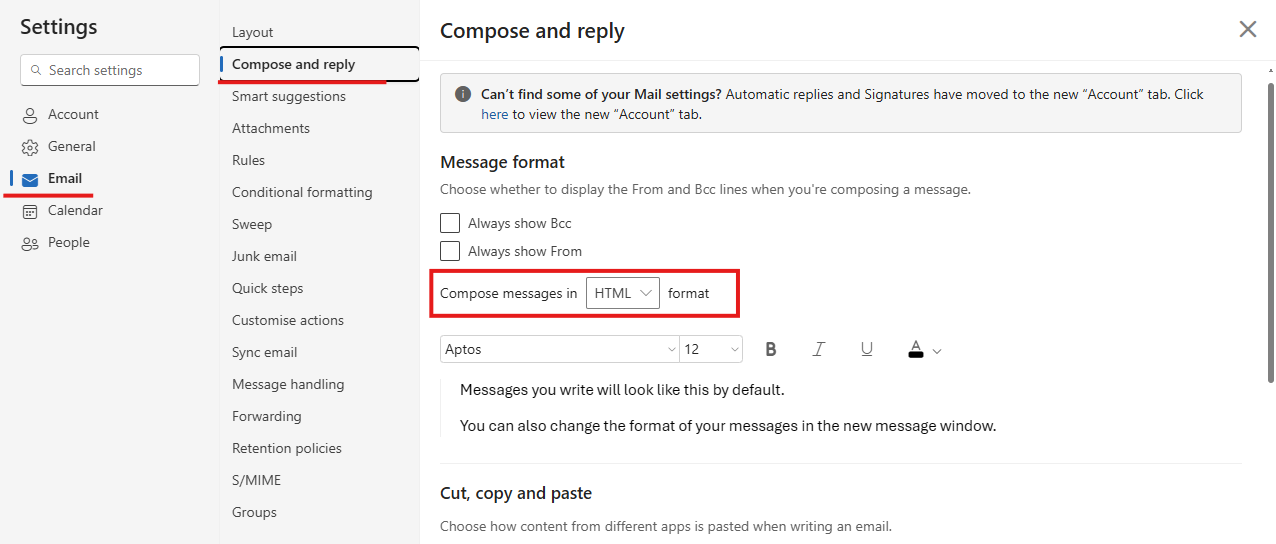
Outlook: Signature Images not showing.
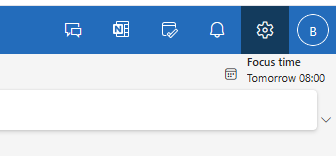
1. Open the Setting menu
Find the Gear icon, top right of the screen (near your profile picture).
2. Compose in HTML Format
Go to Email > Compose and reply > Ensure Compose messages is set to HTML.
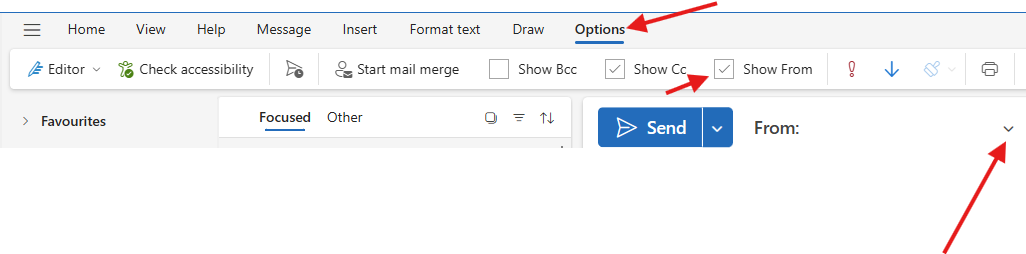
Outlook: Send from another mailbox
This Quick article goes through enabling the "send from" options on your outlook to enable you to select a mailbox from which the email will be sent by.
1. Click "New Email"
Click "New email".

2. Enable "Show From"
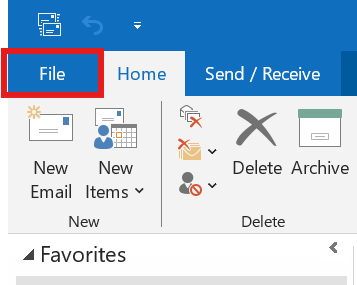
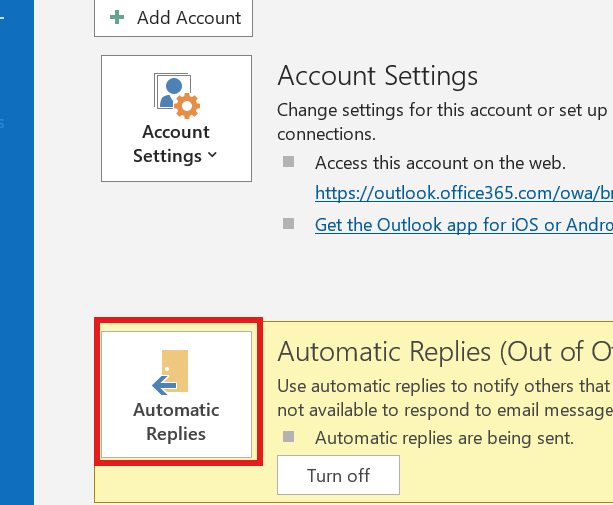
Outlook: Setting up Out of Office Message (Classical Outlook)
Quick guide about setting up out of office reply on classical outlook.
1. Open File's Tab
Click the file tab.
2. Select Automatic replies
In the Info Section, find the automatic replies and open it.
3. Configure your reply
In here you can configure the automatic reply you want to be sent to insiders and outsiders.
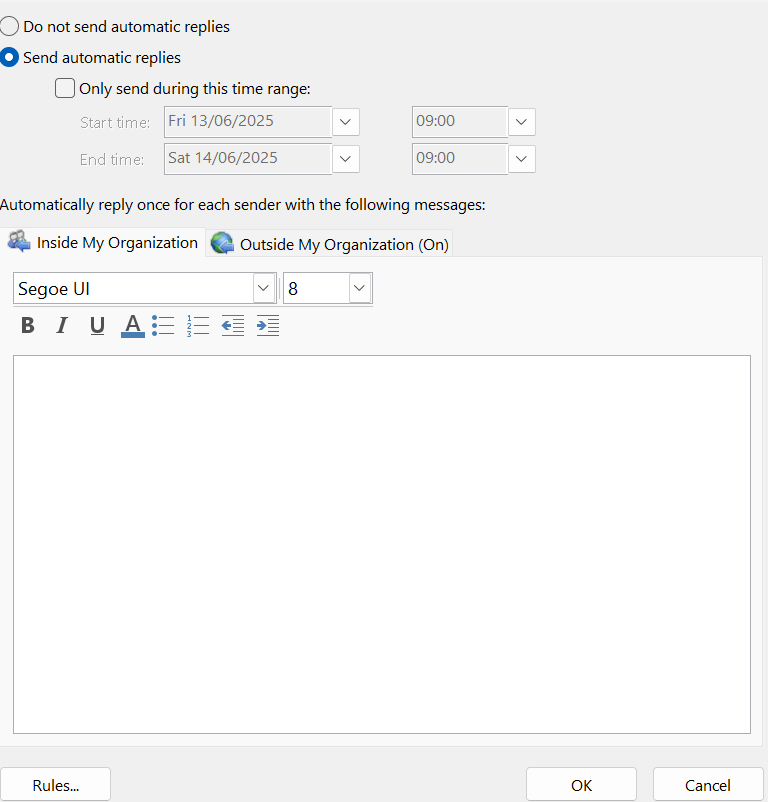
4. Things you might consider
You might want to consider the following when configuring:
- Adding your signature at the bottom on the reply. ( Simply copy and paste your current signature)
- Setting an Outside my Organization reply
- Sending a message between a particular time period. (check the 'only send during this time range' box)#
- Adding rules if you want the reply to be more targeted.
Outlook | Logging into Outlook
1. Open a web browser and type "office.com" in the search bar.

2. Click the "Sign in" Icon top right
3. Login with the email credentials we have provided.
4. On the bottom left, click on apps and select Outlook
Ticketing System
Pages relating raising a ticket
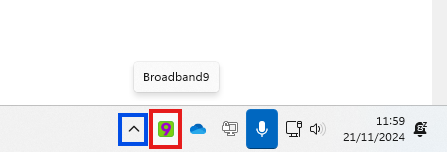
How to raise a Ticket with 9 Technology Group LTD
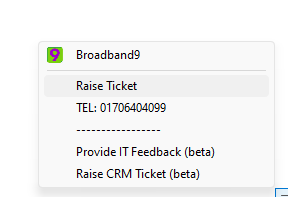
Method 1: via the 9 Logo on your task bar
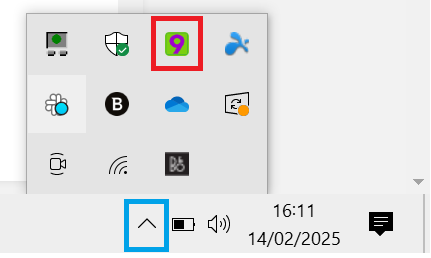
1. On the bottom right of your screen, locate the Purple Number 9 icon and click on it. Sometimes it might be hiding in the up-arrow menu (Highlighted Blue).
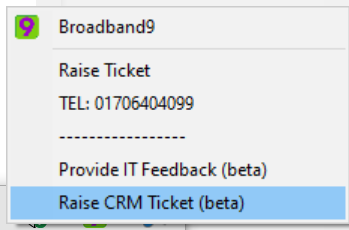
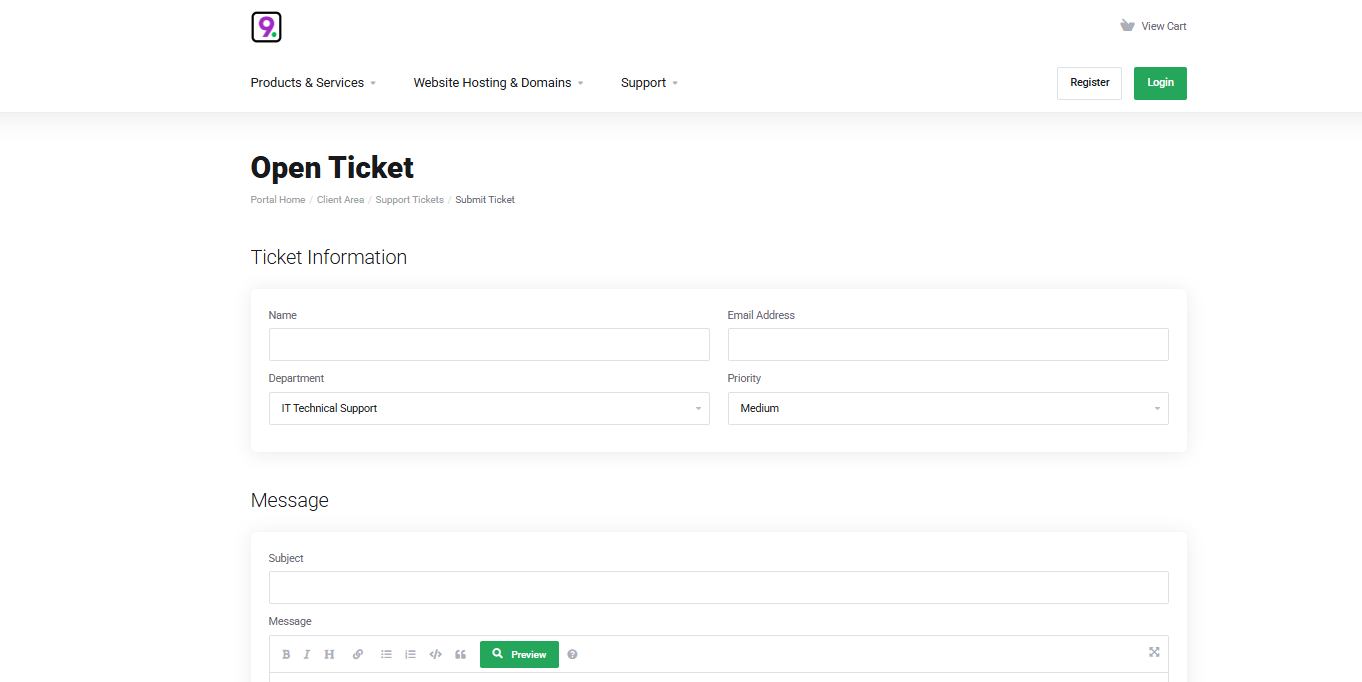
2.Click the “Raise CRM Ticket”, after which it should open your web browser to the CRM ticket creation page.
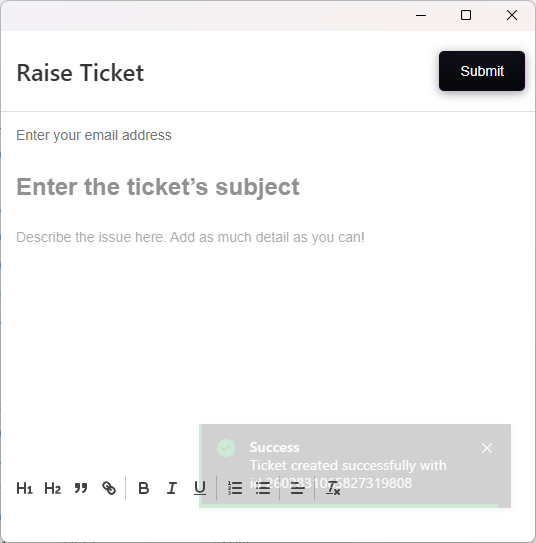
3. Fill in the ticket with whatever details that are required, then click Submit. After submitting the ticket, the ticket will be received by the relevant department you have chosen in the ticket.
Method 2: Via the Online form
There is an online form that you can access directly.
You can bookmark the link.
Method 3: Via Email
You may email in your Support enquiry by emailing to ticket@9.technology
This will automatically get raised within our system as an IT Support ticket for our team to look at and respond to.
Method 4: Via telephone
These are our telephone and email contacts for your convenience :
|
Email addresses:
|
|
|
Technical Support
|
|
|
Finance / Invoice Enquiries
|
|
|
Sales Email
|
|
|
Account Management
|
|
|
Confidential Feedback
|
|
|
|
|
|
Contact Numbers:
|
|
|
Telephone Contact (Support and other enquiries)
|
01706 404099
|
|
WhatsApp Contact
|
03330 509960
|
|
IT Support Hours
|
9am – 5PM Monday to Friday
(Including Bank Holidays)
|
|
Out of Hours
|
Email / Ticket only
|
|
Emergency Mobile
|
07864601301 (Ibrahim / Director)
|
|
|
|
|
Portal Links:
|
|
|
Your 9TG Account Login Site |
https://portal.9.technology/index.php?rp=/login |
How to raise a Ticket with 9 Technology Group LTD (Superops)
Method 1: Via the 9 Logo on your task bar
1. On the bottom right of your screen, locate the Purple Number 9 icon and click on it. Sometimes it might be hiding in the up-arrow menu (Highlighted Blue).
2. Click the “Raise Ticket”, after which it should open your web browser to the Superops ticket creation page.
It will then bring up a web page asking you for the details of your enquiry.
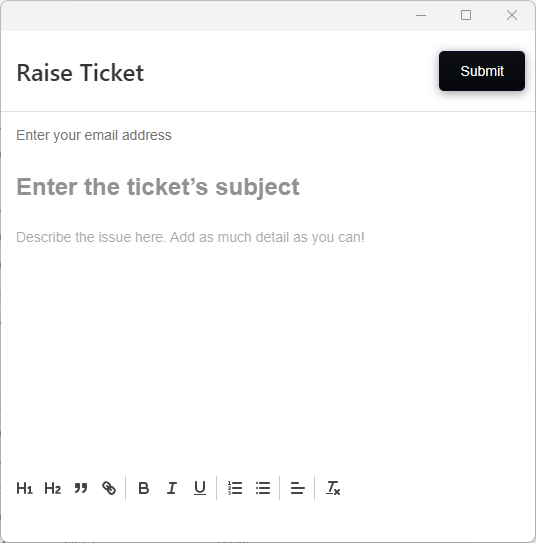
3. Fill in the ticket with whatever details that are required, then click Submit. After submitting the ticket, the ticket will be received by the relevant department you have chosen in the ticket.
Method 2: Via email
You may email in your Support enquiry by emailing to ticket@9.technology
This will automatically get raised within our system as an IT Support ticket for our team to look at and respond to.
Method 3: Via telephone
These are our telephone and email contacts for your convenience :
|
Email addresses:
|
|
|
Technical Support
|
|
|
Finance / Invoice Enquiries
|
|
|
Sales Email
|
|
|
Account Management
|
|
|
Confidential Feedback
|
|
|
|
|
|
Contact Numbers:
|
|
|
Telephone Contact (Support and other enquiries)
|
01706 404099
|
|
WhatsApp Contact
|
03330 509960
|
|
IT Support Hours
|
9am – 5PM Monday to Friday
(Including Bank Holidays)
|
|
Out of Hours
|
Email / Ticket only
|
|
Emergency Mobile
|
07864601301 (Ibrahim / Director)
|
|
|
|
|
Portal Links:
|
|
Office
Articles related to word, excel, PowerPoint... etc the Office software suite.
Office: Converting a file into a PDF
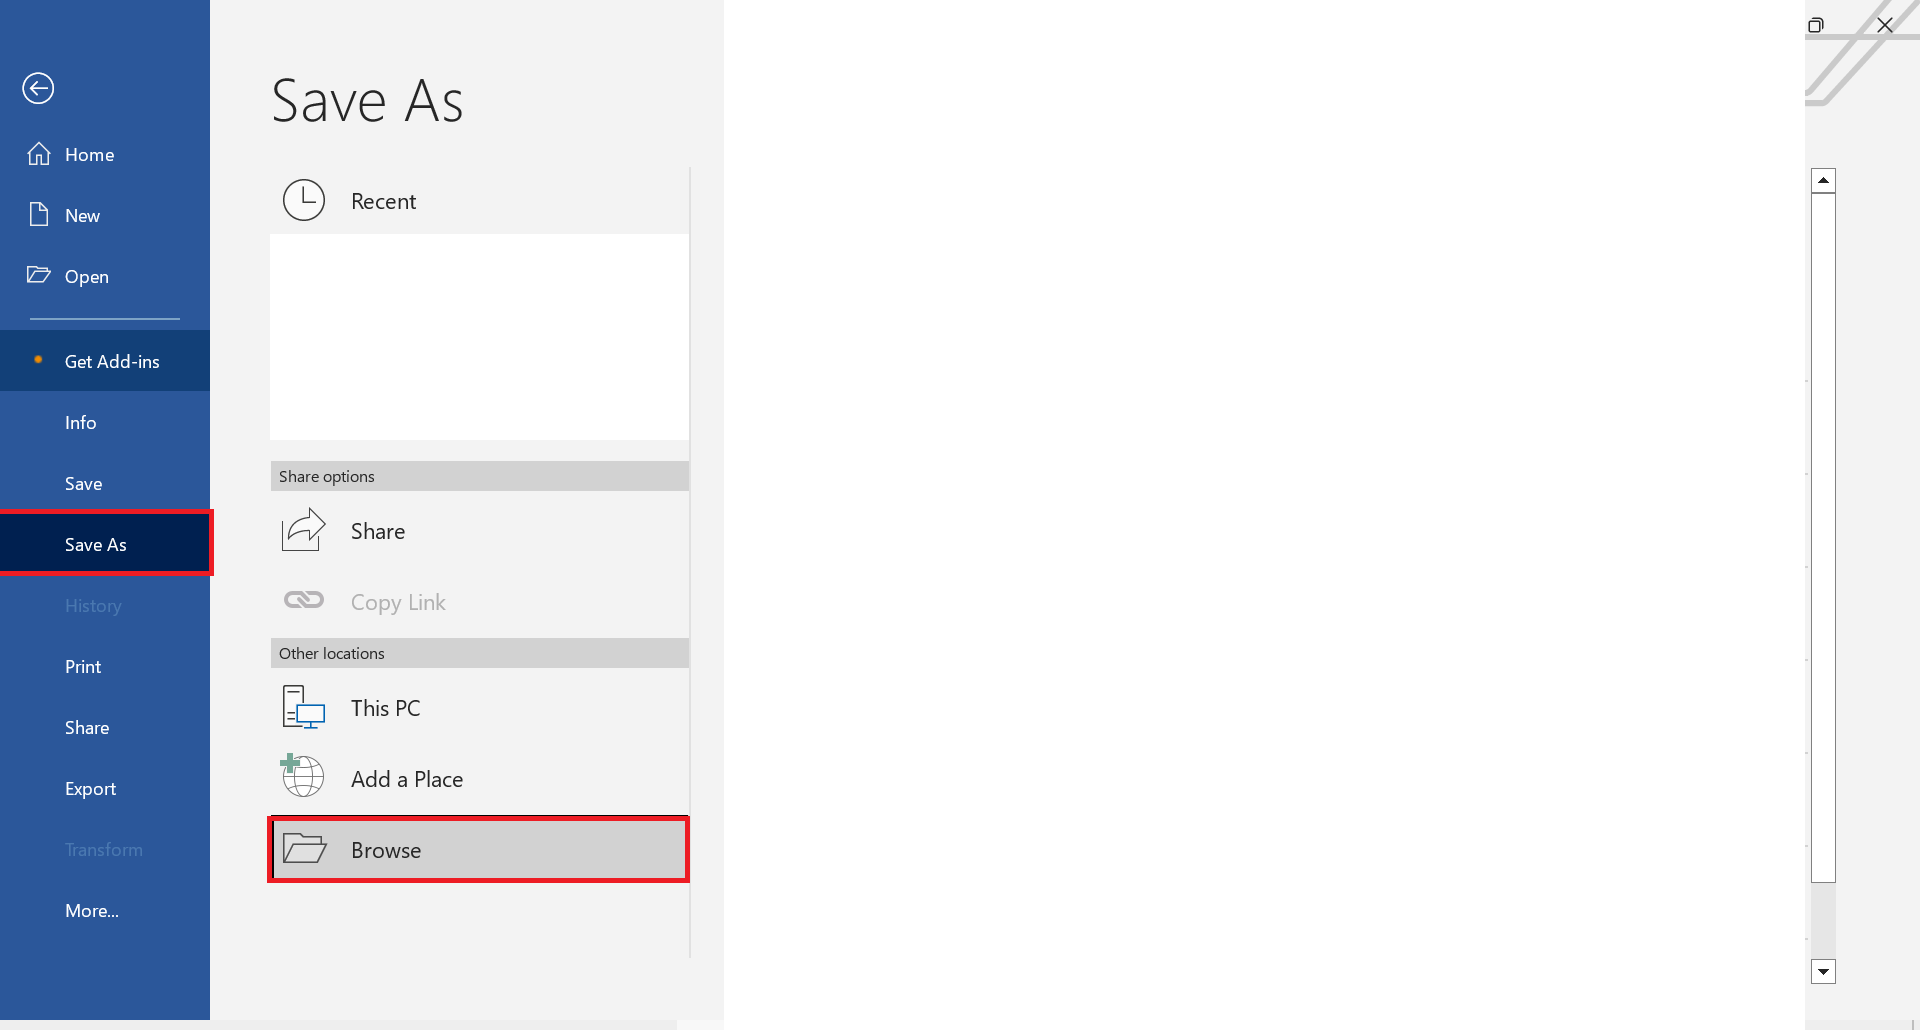
You might require to save a document in PDF format. This article shows you how to convert a word document into a PDF. although we have demonstrated it using word it will work on excel, PowerPoint... etc
1. Open File Tab
Top-right click File Tab.
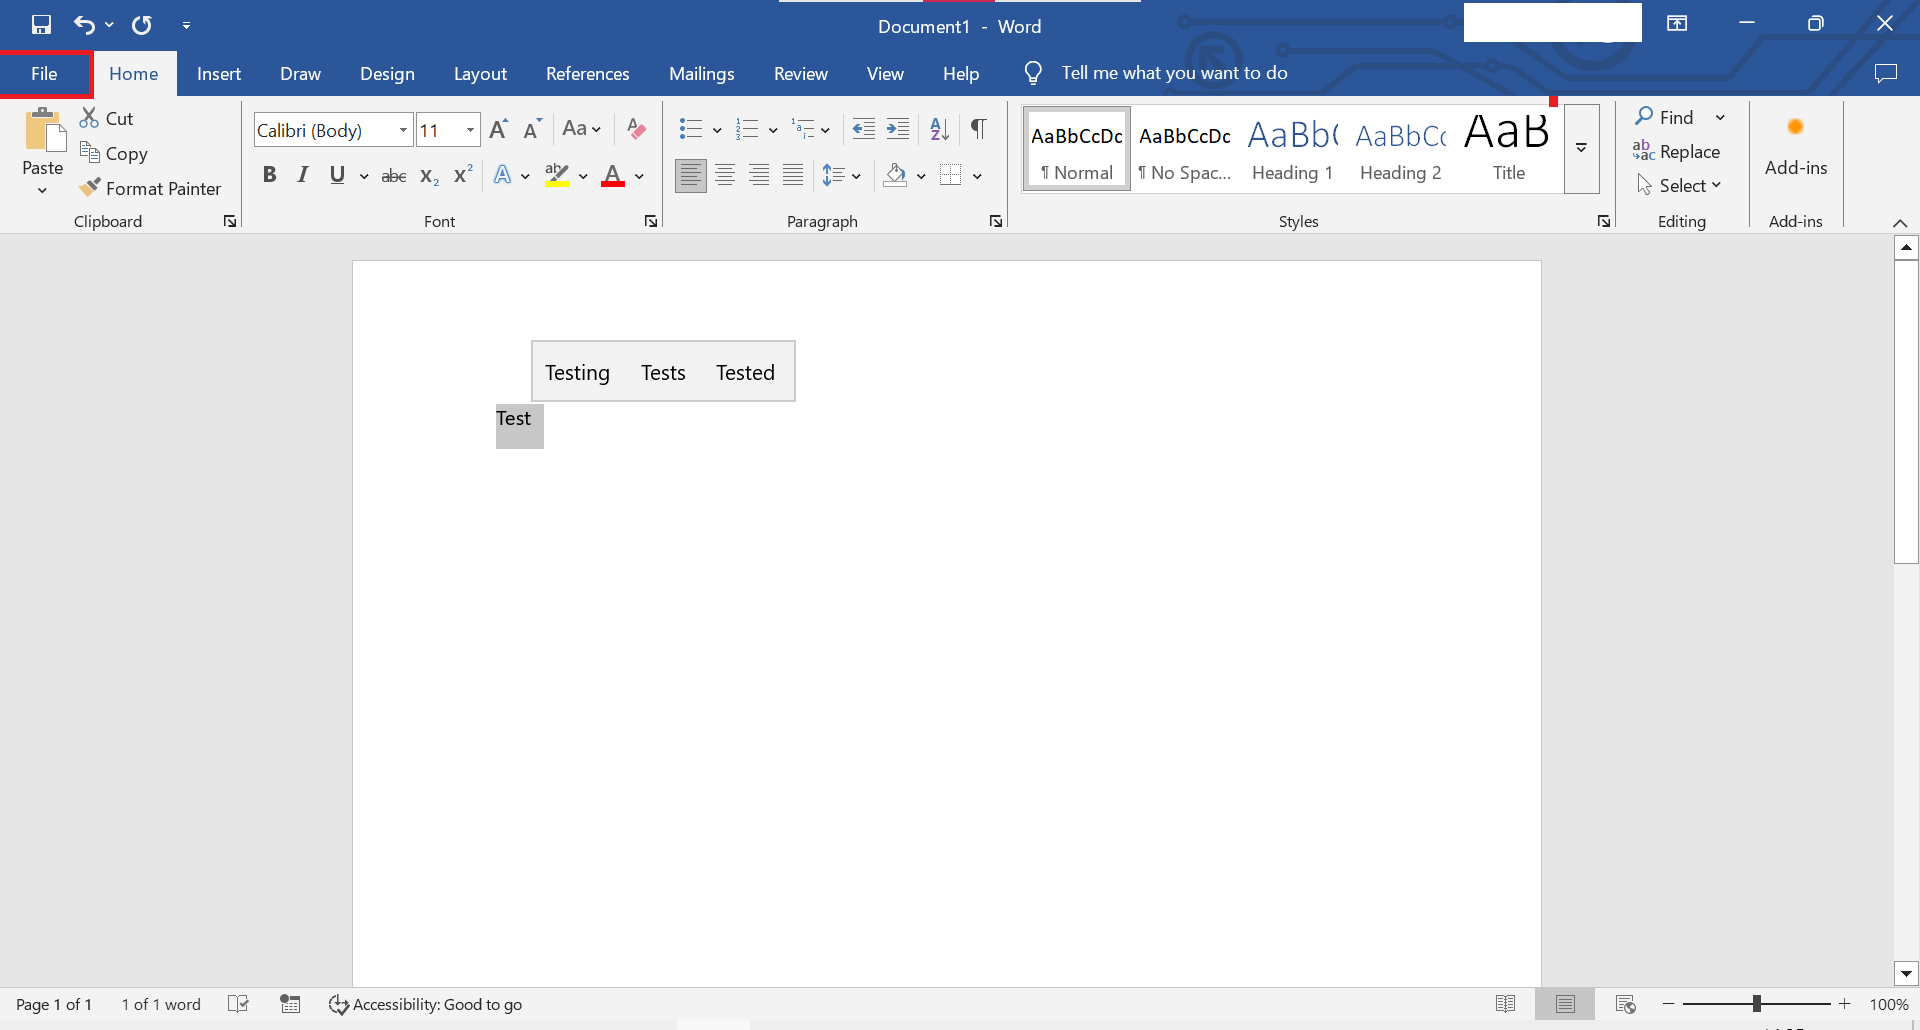
2. Save As Tab
Inside save as tab, look for the browse button.
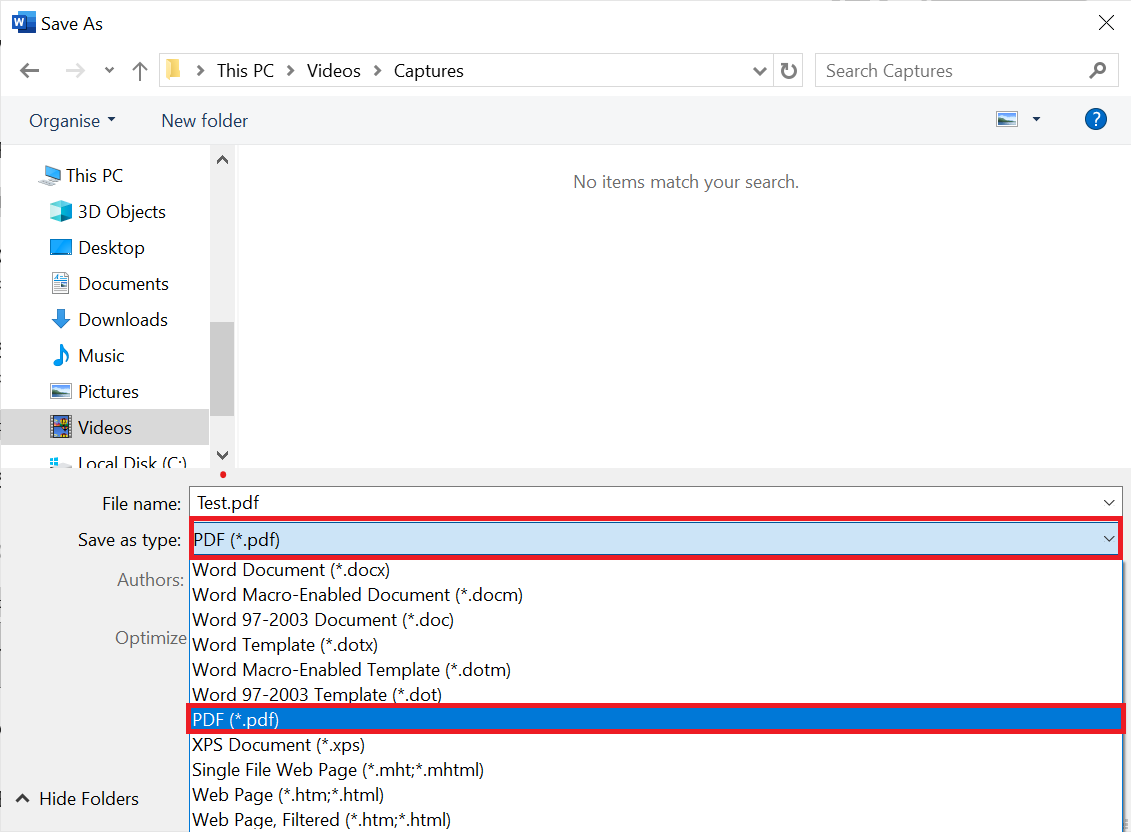
3. Save as type PDF
Under the file name, you can select what file type you would like to save your word document as. Make sure you have already saved it as a Word doc before saving it as a PDF.
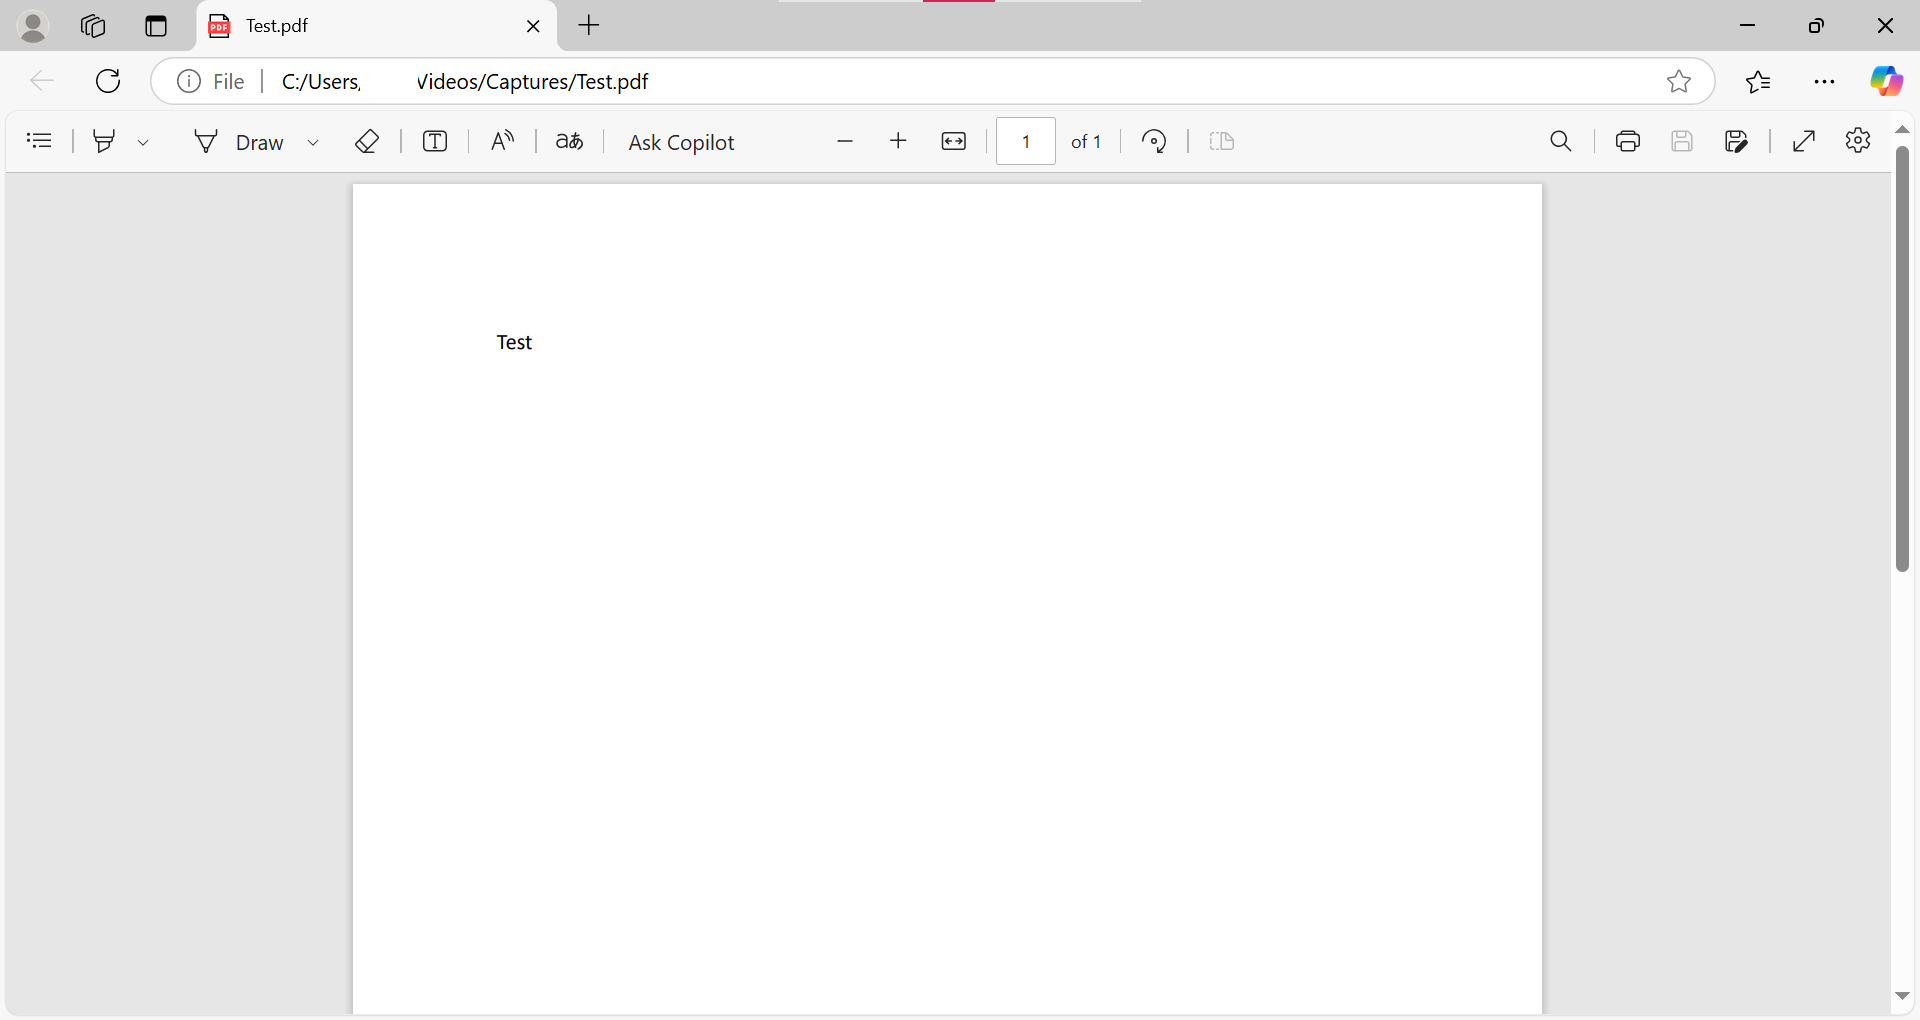
4. Converted to PDF
As soon as you click save, it will open the PDF.
Word: How to Password Encrypt a PDF File
You can use Microsoft Word to encrypt a PDF file. This quick guide shows you how to Password Encrypt a PDF File using Microsoft Word.
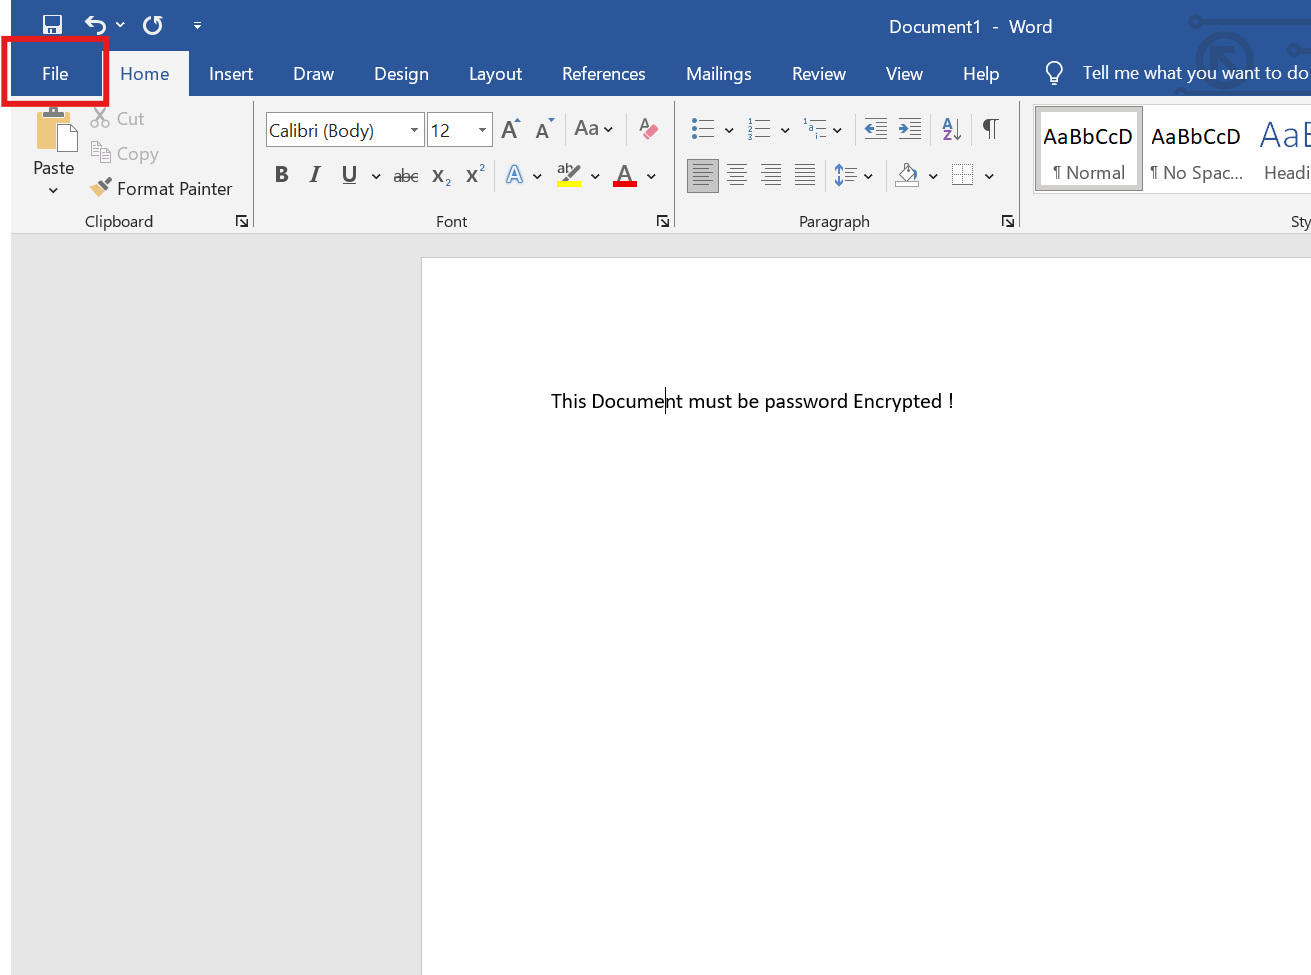
1. Open the File menu
Once you have opened the document, click the file menu at the top-left of the screen.
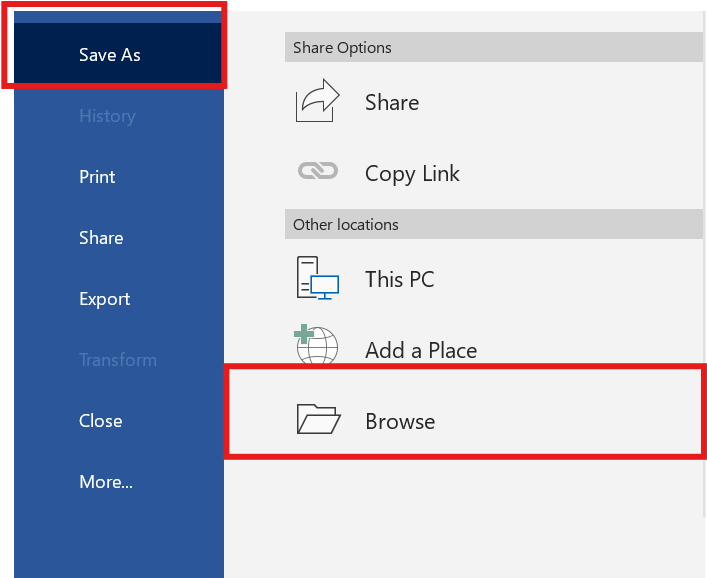
2. Save As > Browse
Click Save As > Browse
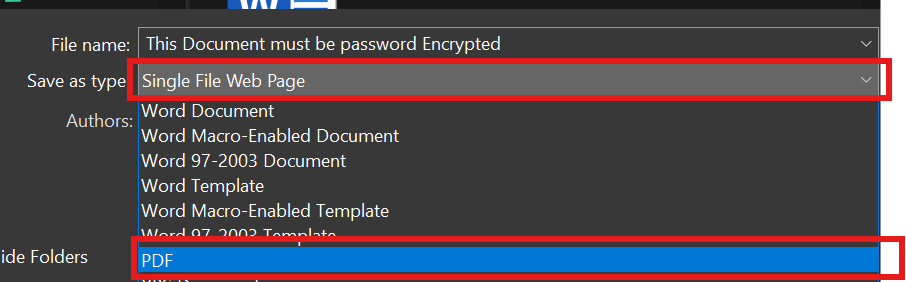
3. Save as Type as PDF
Click the drop down menu and choose PDF
4. Click the option button
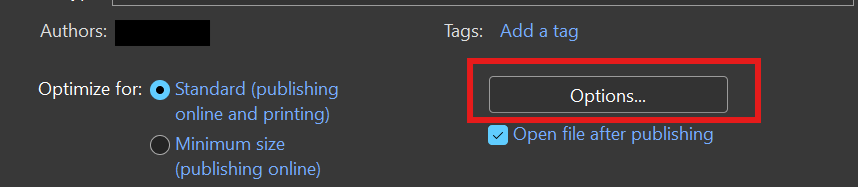
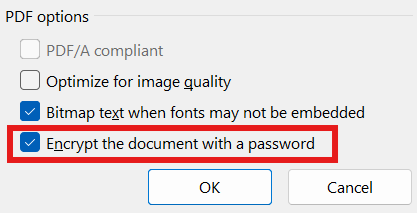
5. Enable "Encrypt the document with a password"
At the bottom of the windows, make sure the "encrypt the document with a password" is ticked. then click OK.
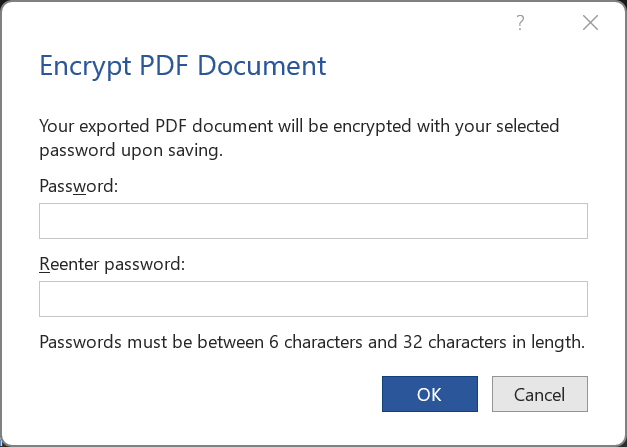
6. Enter a password
Soon after you click OK, you will be requested to enter a password.
7. Save the PDF
Lastly, choose a location where you want this PDF + Password encrypted to be stored at.
Hardware
Pages relating to Hardware issues
Monitor: No Signal Issues
A No signal error message could appear on your screen due to several reasons. In this article we will tackle the issues that are causing your screen to display the “No Signal” error message.
Why does the “No Signal” error message appear?
The “No Signal” message appears on your screen to inform you that the monitor is not receiving any display signal from your computer or laptop. Most monitors also switch off after displaying this message after a couple of seconds; and usually your power button LED shines a yellow/orange light (But not exclusively).
1. Loose Cable
Display cables can fall loose after long time being connect to your monitor and moving the monitor around. So, ensure tight connection from each end of the cable, you should feel a click if the cables were loose.
2. Software Misconfiguration
If that didn’t work, then before we assume the cable is faulty, we want to see if the issue lies with the software side of things. Although we take it for granted connecting a screen to our laptop and within seconds it starts working, sometimes a misconfiguration on your laptop/desktop could be the cause of the problem. Let’s walk through how you can identify a misconfiguration:
Assuming that you are logged* on to your machine click both the windows key ![]() + P
+ P

PC screen only – if this setting is selected then it will only display your laptop/Desktop screen and display nothing to your monitor. Ensure the appropriate Display view is selected.
Perhaps the issue has not been fixed, in that case we need to ensure if our computer is detecting the second monitor. To check whether our laptop/desktop is detecting the second monitor we can do the following step.
1 1) Click the windows key ![]() + S
+ S
2 2) Type “Display Settings”

3 3) Click “Detect”

3. Wrong Input Display
We have previously looked at software misconfiguration, but what about hardware misconfiguration? Sometimes the issue could be that your monitor is trying to connect to a completely different display terminal and therefore we will need to correct this misconfiguration.
This solution varies depending on the monitor you have in front of you and settings could look slightly different to those in the examples below.
1 1) Assuming your monitor is in standby mode (orange/yellow light on the power button). If not please turn the monitor back on*

2) Find the Buttons for you monitor, Possible locations: Bottom left/right or Middle, sometimes at the back, Near the power button.

3) Click the first button away from the power button. you might need to click it again because the first click wakes up the monitor*
4) Depending on your monitor a menu should appear with possible display input selection like VGA, DisplayPort, HDMI…etc. Generally, the menu should look something like in the image below.

5) Selecting auto allows the monitor to auto detect the display input and prevent issues like misconfiguration. If you don’t happen to have that option then keep trying each display input until the right one works.
4. Faulty Cable
If all fails and you have tried the previous solutions and nothing resolved the problem, then you can safely assume maybe the cable is faulty. To test that, try finding a similar display cable as the one that isn’t working and use that instead. Additionally, test the current cable that you have by plugging it into another device or monitor. If the cable worked on another monitor or device then the issue could be with your monitor or device display ports. However, it is highly unlikely for monitor ports or device ports to fail and usually the cable is the issue.
Thanks for reading this Article, if you are still experiencing issues and nothing has been resolved then please contact the support team.
Mouse & Keyboard: Not working
When we are generally troubleshooting an issue we should start thinking of the most common cause rather than ruling it off as broken. This article will cover solutions to when your mouse or keyboard stops working.
1. Disconnect and reconnect
Depending on the mouse or keyboard you are using, its either Wired, wireless or Bluetooth. In either cases they would been connected to your device either physically via USB or Wirelessly via Bluetooth.
Wired = a wire coming from the mouse/keyboard connecting to your device
Wireless = a USB dongle connected on the device which specifically connects your mouse & Keyboard to the device wirelessly.
Bluetooth = The mouse or keyboard has been paired to the device via Bluetooth wirelessly (No wire or USB dongle).
Depending on the type of mouse or keyboard you are using (as mentioned above), either unplug or disconnect the mouse/keyboard then plug or reconnect/pair the mouse/keyboard.
This could very be the solution to the problem.


Caption: Windows 10 action centre enabling and disabling Bluetooth.

Caption: USB Mouse/Keyboard dongle
2. Restarting you machine
The second solution should rule off the issue if it was caused by windows. Sometimes Windows might fail to register the device at a specific point of time which causes the software which communicates with the mouse or keyboard to crash. This is referred as to as a crashed driver.
Typically restarting your device resolves the issue. But before you do restart, make sure to save your work. You can use a different mouse or keyboard temporarily to save your work. After restarting the mouse or keyboard that wasn't working should start working.
Unsure how to restart your device? Click here
3. Replace dead batteries
This solution is only catered to those wireless or Bluetooth Mouse/Keyboards. Underneath the mouse/keyboard - unless they are chargeable mouse/keyboard - there is a cover which holds the battery in place. Change the current battery 🔋 with a newer one. Give it a test to ensure the mouse/keyboard is working.
Alternatively check if the mouse/keyboard was switched off. Some mouse/keyboards have a switch mode on/off to save the battery life. Ensure the mouse/keyboard is switched on then give it a test.

Caption: A new battery being inserted in the battery cover in a wireless keyboard.
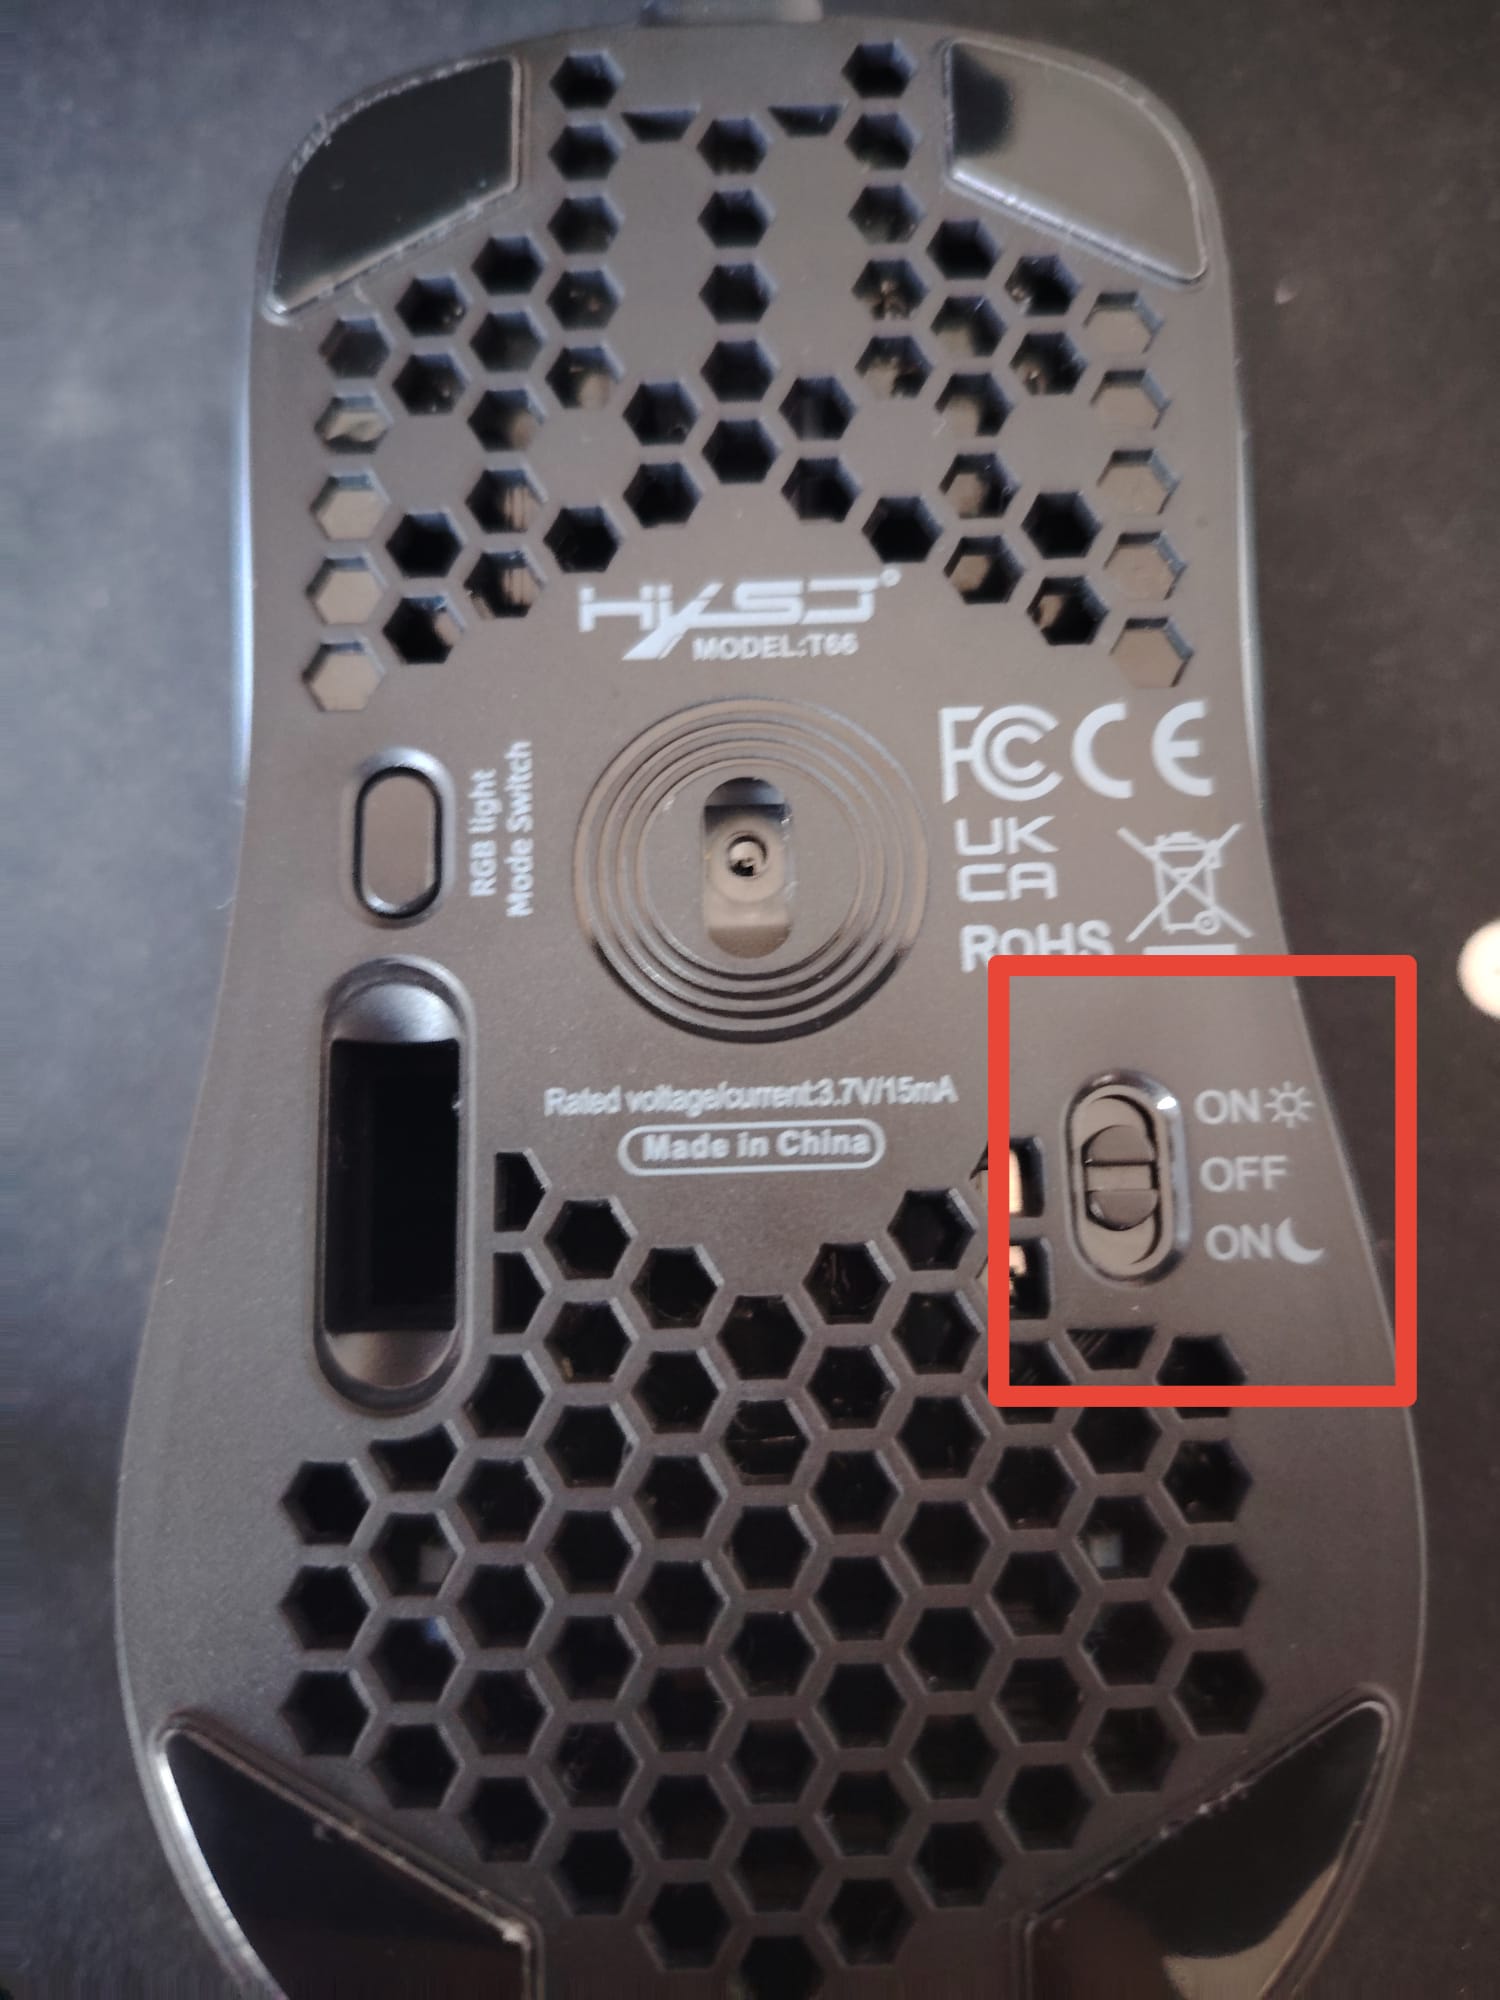
Caption: Underneath a mouse showing the switch modes
Networking
Pages relating to Network Issues
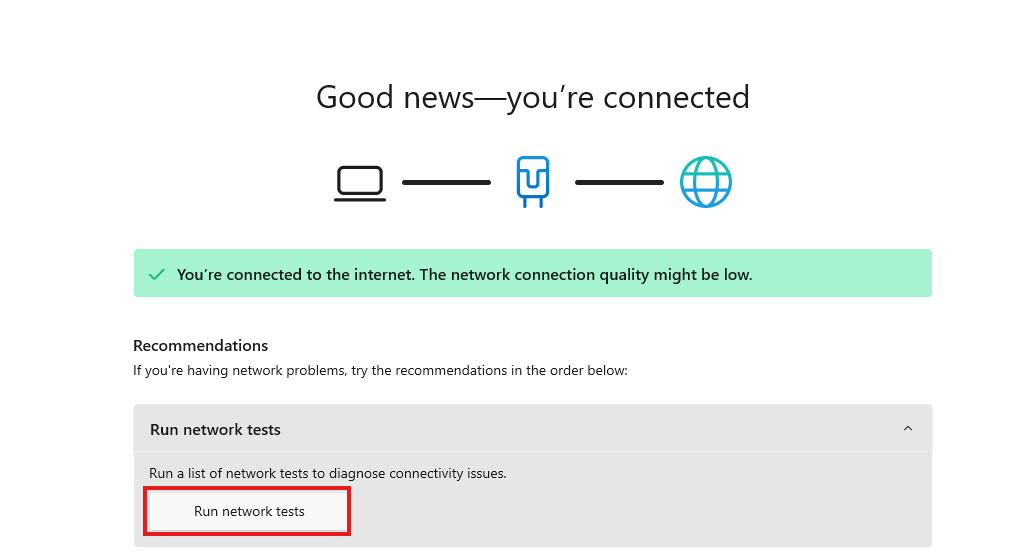
Networking: Troubleshooting Internet connection Issues
Internet Issues can arise unexpected and can cause disruption to your work. Some issues can be caused due to loosen connections, other times it could be software misconfiguration. In this short article, we will look into the most common network issues.
Things to consider when troubleshooting network issues:
1. Network cable (known as an ethernet cable)
2. Globe icon instead of a computer icon.
3. Not able to access websites
4. Other staff not able to connect
1. Refresh the site
Sometimes there is no issue with your internet connection but rather the website itself is having some issues. To make sure of that, simply look at the network icon on the bottom left of screen.

Figure 1 Network icon showing the computer is connected to the internet

Figure 2 Network icon showing no connection to the internet.
If the network icon is showing a connection to the internet, then the issue could be with the website itself and not your computer. However, if you don’t have connection to the internet then, the issue is with your machine. In this case, give it a minute because it could be a momentarily disconnection from the internet.
2. Checking the network interface
The network interface is where your computer receives and sends data across the internet. Your interface can be Wi-Fi or a physical network port behind your computer. We can check if these interfaces are functioning correctly.
1. Click CTRL + R to open Run (Bottom Left)
2. Type ncpa.cpl
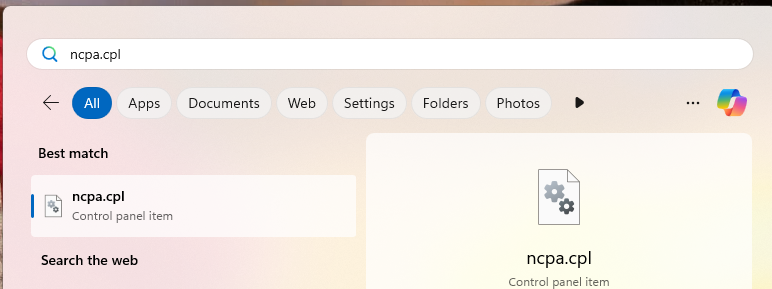
3. Find the Ethernet or WIFI Interface
4. In the event of a misconfigured, Open the interface by double clicking it. Find and click “Diagnose” and follow its instructions.
3. Loose network cable
The network cable is commonly referred to as the ethernet cable. This is a physical cable that connects to your physical ethernet interface on your computer to a switch or patch port on the wall.
Like anything that connects to a computer, it can get easily loose over time or damaged in some cases.
Make sure both ends of the cable are connected correctly to their respective interfaces. These interfaces also have a green and amber LED indicators that flash frequently to indicate they are working.
If the cable is faulty or a loose connection, then the LED will not light up.

Figure 3 Network interface.
4. Restart the computer
A Process or service on your machine that has failed could cause your computer to disconnect from the internet or prevent you from accessing websites. As long as others staff within the same network as you are not experiencing a network failure, then give your computer a quick restart, this could fix the issue.
If other staff members are experiencing the same issue as you are, then the issue is mostly likely related to the internet service provider having an issue on their end. In Other cases it could be one of the main network devices had failed although very uncommon.
In either cases contact us or your manager, so we can have look at the issue in-depth.
Thanks for reading this Article, if you are still experiencing issues and nothing has been resolved then please contact the support team.
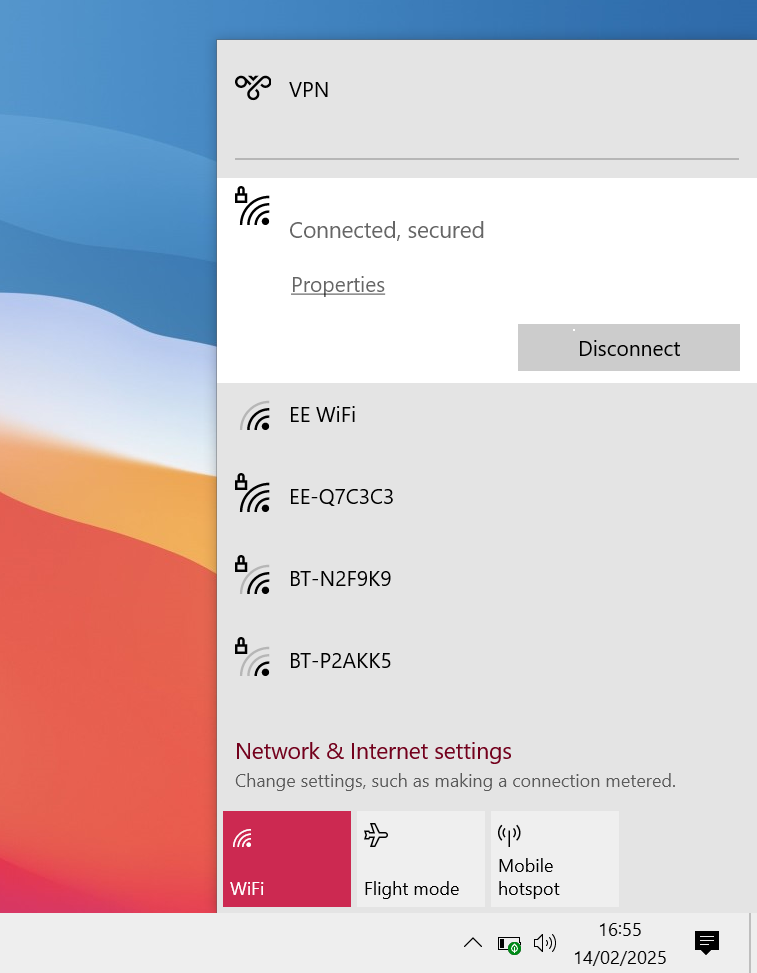
WIndows: How to connect using WIFI
What will be covered:
- How to connect to your local WIFI.
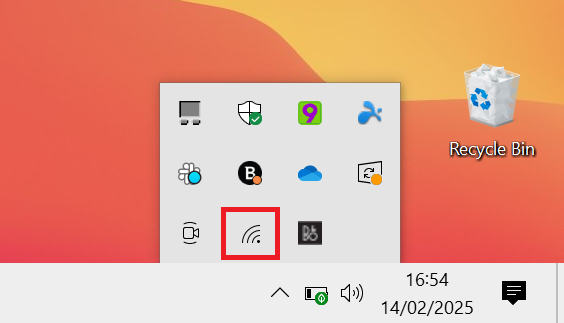
1. Open The WIFI menu
Find the Network icon in the bottom left Connor of you screen. It could be hiding in the up arrow menu,
2. Connect to your WIFI
In the list of available WIFI's, find your routers WIFI name and click connect.
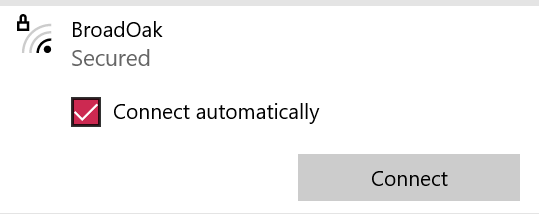
3. Enter the password
Enter the WIFI password.

Security
Pages Relating to Security
Bitdefender: Scanning Files for Viruses
We will cover the following:
How to scan a file using bitdefender.
1. Find the location of the file.
it is more than likely to be in your downloads folder, if you have downloaded it recently.

2. Scanning with Bitdefender
Right click the file and choose “Scan with Bitdefender…”

3. Checking Bitdefender
To find the results, Locate the up arrow on the bottom right of your screen. Right click the bitdefender icon (B), click show.

4. Open Event log
In the event log, find the latest contextual scan and click view log.
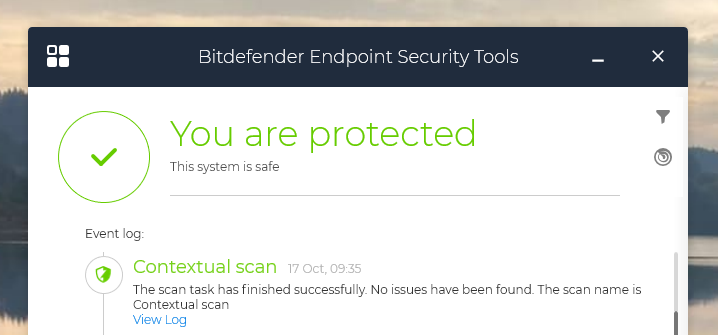
6. Results
The results and statists should appear as drop menus.
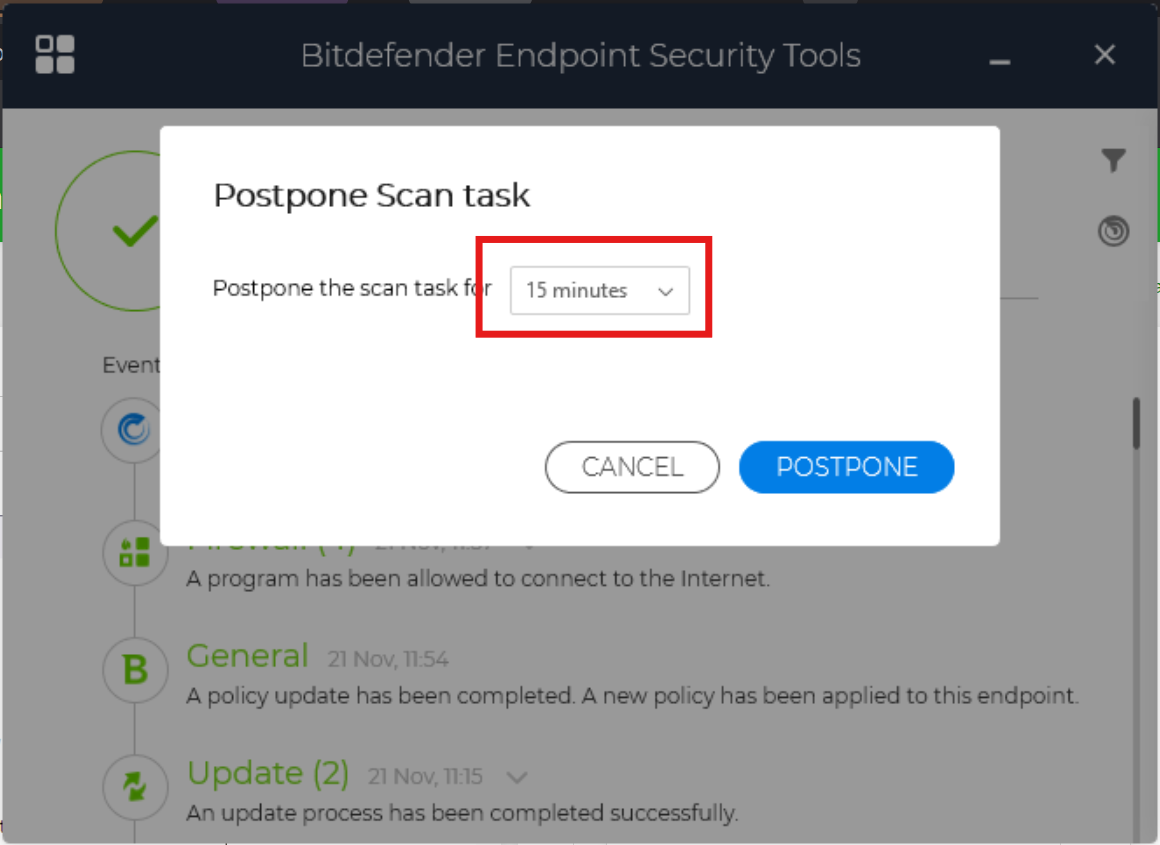
Bitdefender: Postponing Anti-Virus Scans
Bitdefender Scan: Bitdenfer scans ran monthly to check your system for any malware/virsus. When scans happen it can take up a lot of computer resources. So in this article we will show you how to postpone a Scan to ensure you have the best experience when you are working in-times of an Anti-virus scan
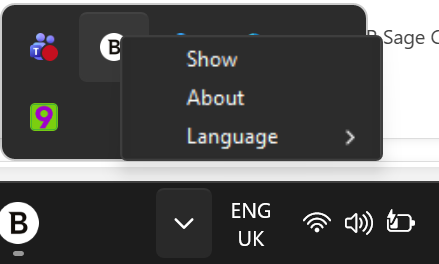
1. Open Bitdefender
Press the up arrow to open up the icon tray menu. Alternatively, you might find the Bitdefender icon on your task bar on the bottom right of the screen.
Once you found the icon, right click it and click show.
2. Postpone the scan
You'll see a similar screen as the image below. Click postpone.
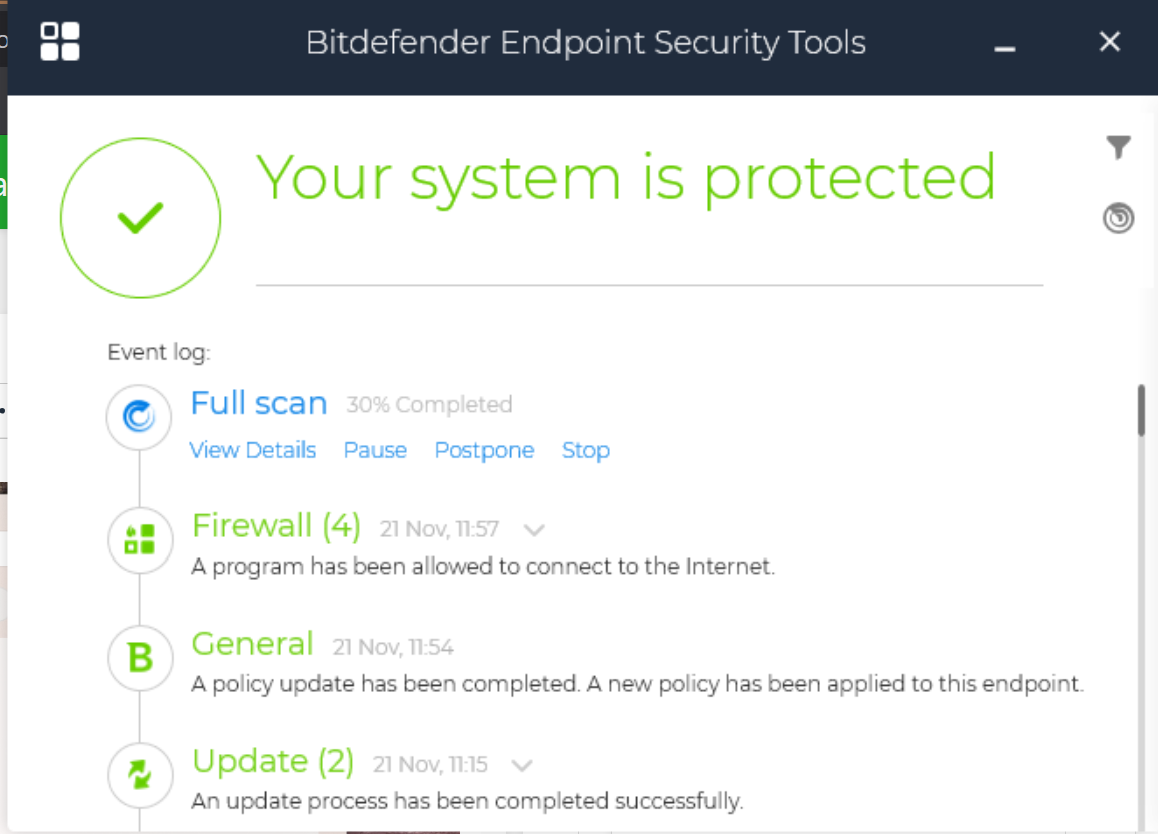
3. Postpone settings
Here you can pick how long to postpone the scan, the maximum is one hour. After an hour, you can postpone it again, if you still working.
Things to keep in mind
- When you are done working, please leave the device on whilst the scan does its job. if its a laptop then make sure its charged sufficiently.
- Once the scan is complete, you will not need to worry about it until next month as per our full scan schedule.
- If scan is not complete and you device is offline, the scan will wait until the device is back on. Once the device is back on it will force the scan and the machine will feel sluggish again. You still have the ability to postpone the scan.
VPN & Remoting
Documentation on OpenVPN
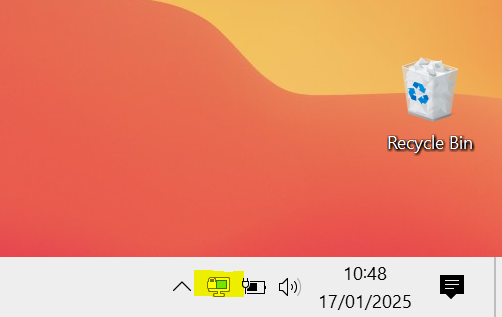
OpenVPN GUI: How to start a VPN connection
What will be covered:
- How start the OpenVPN Application
- How to start a VPN Connection
1. Open the Start Menu
Press the Windows key on your keyboard to bring up the Start Menu.
2. Search for OpenVPN GUI
Type OpenVPN in the search bar, then press Enter to open it.
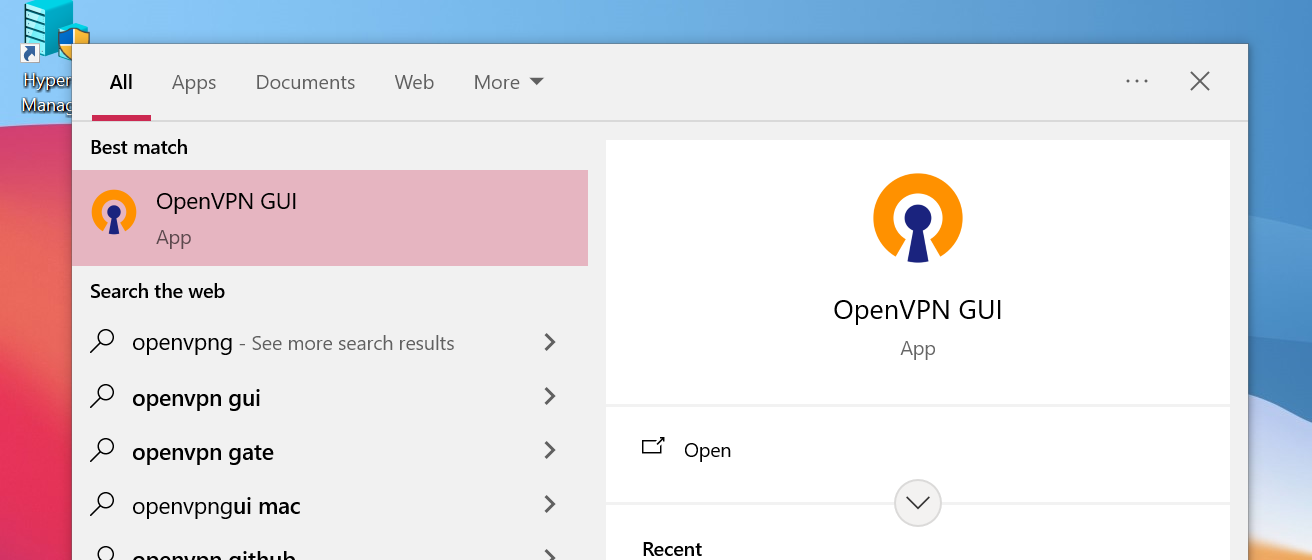
3. Open the VPN Application
Once OpenVPN has started a desktop icon with lock should appear bottom right of your screen. If you are unable to see it, navigate to the up-arrow menu icons and drag it down to the taskbar. Right Click the icon to open the OpenVPN Menu.
4. Check available VPN connections
A VPN connection should all-ready be available to connect to. If no VPN connection are present then contact IT support.
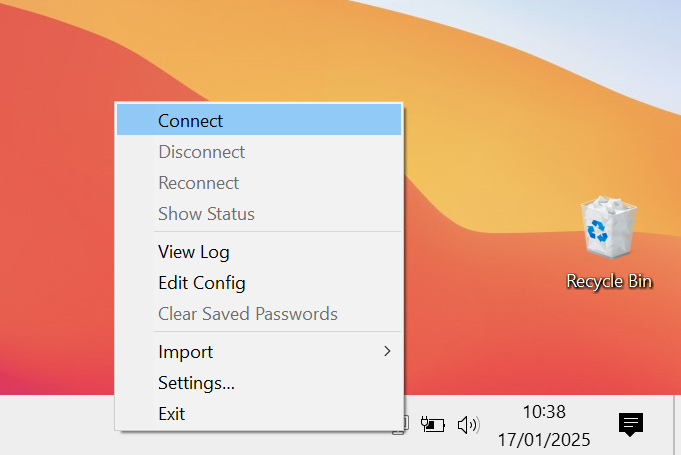
5. Connect to a VPN
Right click the VPN connection and click connect on the new menu that appears. It should ask you for authentication before a VPN link can be established. This would of been provided by your MSP.
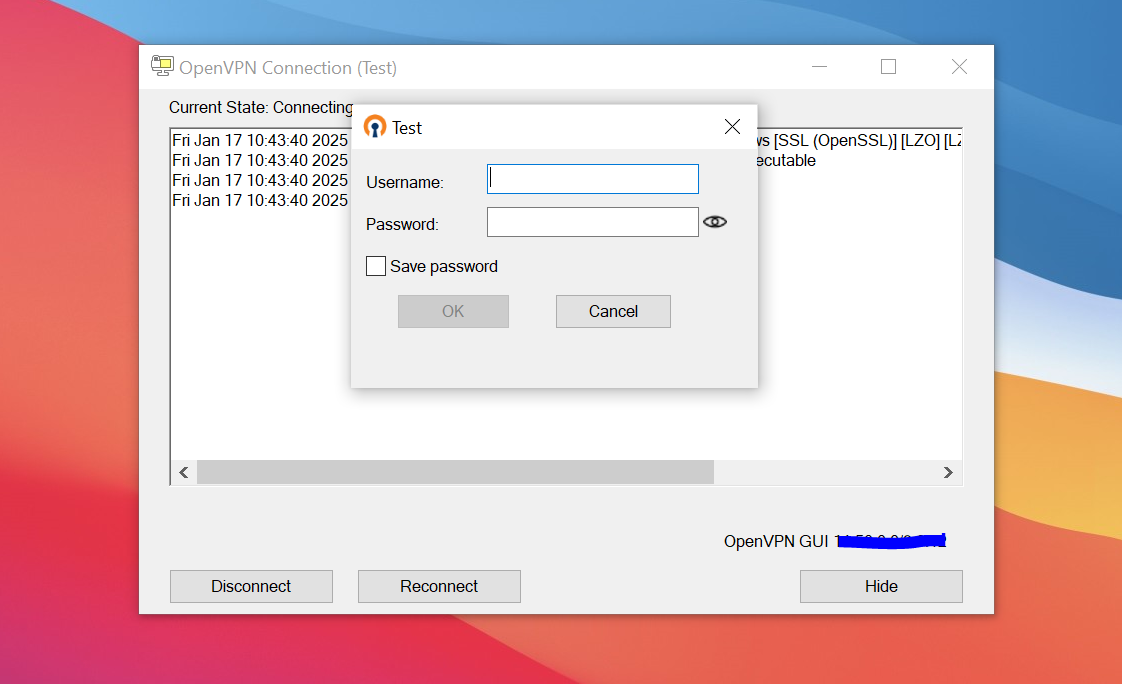
6. Verify connection
Finally, after the connection has been successful, you should be notified that the connection has been established. You should also see the Icon changing to green.
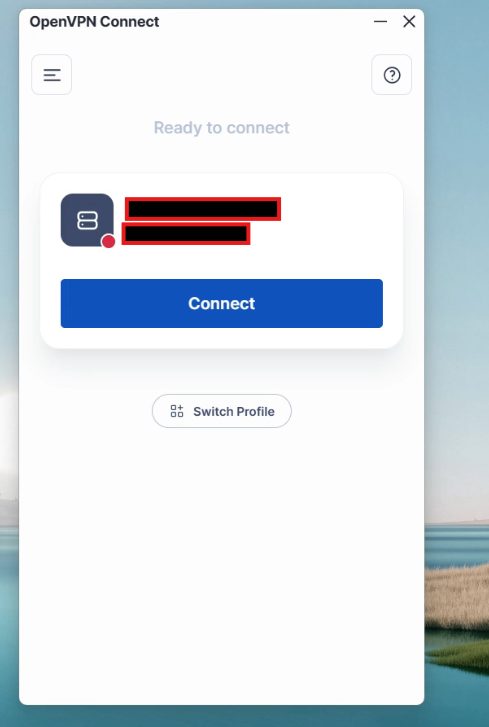
OpenVPN Connect: How to Start a VPN connection
Quick guide showing how to connect to a VPN via the OPENVPN CONNECT software.
1. Open Tray Icon
In the tray, Find the icon below.
If the Application doesn't appear in the tray, Click the windows button and search "OpenVPN Connect". Open the Application.
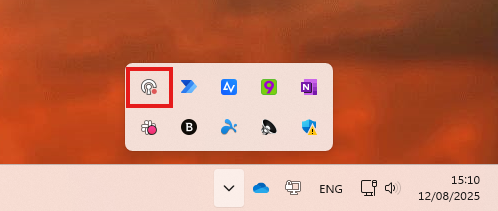
OR

2. Select the VPN Configuration
Click Connect.
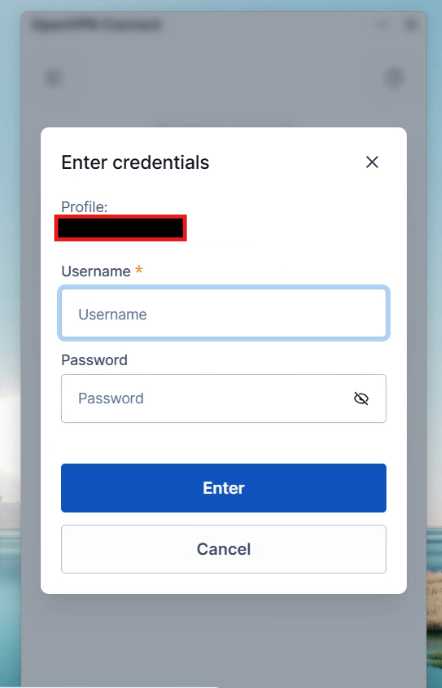
3. Enter in your credentials (If they are not autosaved)
This might be related to your computer login or a credential we have provided you with.
Browsers
Pages relating to Web browsers
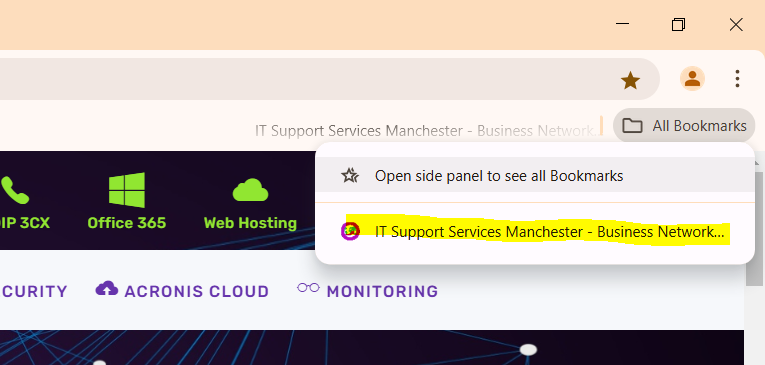
Browsers: Bookmarking Sites
In this guide, we'll show you exactly how to add a bookmark using the Chrome browser. Please note, the steps for Microsoft Edge differ slightly but are similar.
1. Open the Chrome
Open Chrome and navigate to the website you wish to bookmark.

2. Bookmark a site
In the top-right corner, click the Star icon to bookmark the site.
3. Bookmark Bar
Press CTRL + SHIFT + B to display the bookmarks bar if it isn’t visible.

4. Drag & Drop
At the top of the screen, open the "All Bookmarks" menu. Drag the newly bookmarked site from the list onto the bookmarks bar for easy access.
3CX IP Phone
Pages relating 3CX Phones
3CX: Configuring Ports on Your 3CX Server Using nftables
Step 1: Login to Your Server
First, you'll need to access your server via SSH.
ssh username@your_server_ip
Step 2: Open the nftables Configuration File
Once you're logged into your server, the next step is to edit the nftables configuration file. Run the following command to open the file in the vim editor:
vim /etc/nftables.conf
Step 3: Add Your Desired Port
In the vim editor, add the rule for your desired port. For example, to open port 8080 for TCP traffic, you would add the following line:
tcp dport 8080 accept
Or if you want to add multiple ports for TCP/UDP, you should add the following line:
tcp dport {8080,8443} accept
udp dport {7000,150} acceptEnsure you place this line in the correct section of the configuration file, typically within the table and chain definitions for your firewall rules.
Step 4: Save the Configuration File
After adding your port rule, you need to save and close the vim editor. To do this, follow these steps:
- Press
Escto exit insert mode. - Type
:wqand pressEnterto write the changes and quit the editor.
Step 5: Backup the Configuration File
Before applying the new configuration, it's a good practice to create a backup of the current configuration file. This ensures you can easily revert to the previous settings if something goes wrong. Run the following command to create a backup:
cp /etc/nftables.conf /etc/nftables.conf-BAK
Step 6: Apply the New Configuration
Finally, apply the new nftables configuration by running the following command:
sudo nft -f /etc/nftables.conf
This command loads the rules from the configuration file and applies them to your firewall.
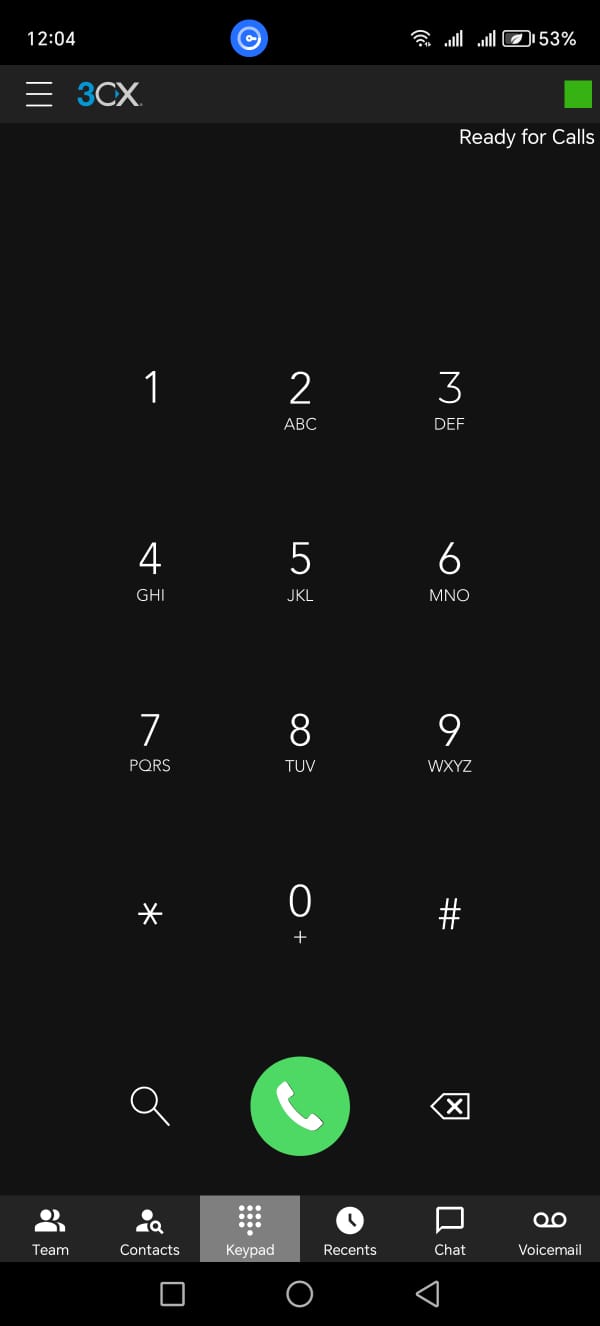
3CX: Setting Up 3CX on Mobile
What will be covered:
- How to set up the 3CX soft phone on your phone.
1. Open Google Store /Apple Store
Open the google store or Apple store and search 3CX.

2. Search & install 3CX
Click install or download on the 3CX App.
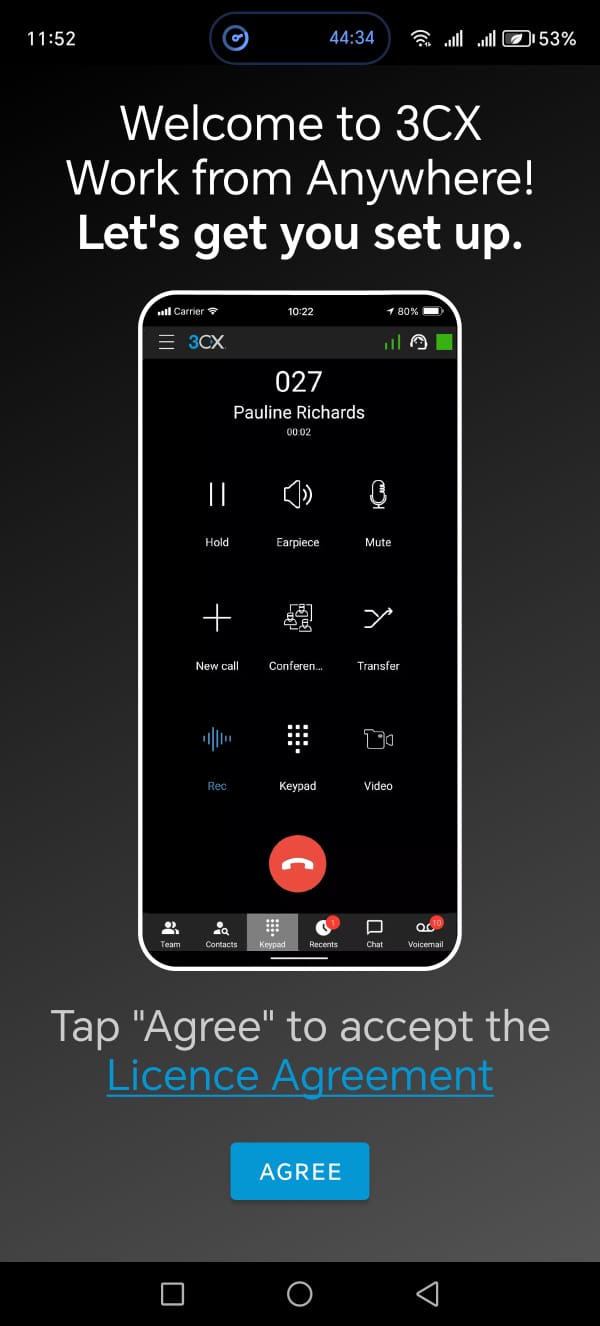
3. Open 3CX Mobile Application
Open the app and click agree on Welcoming screen
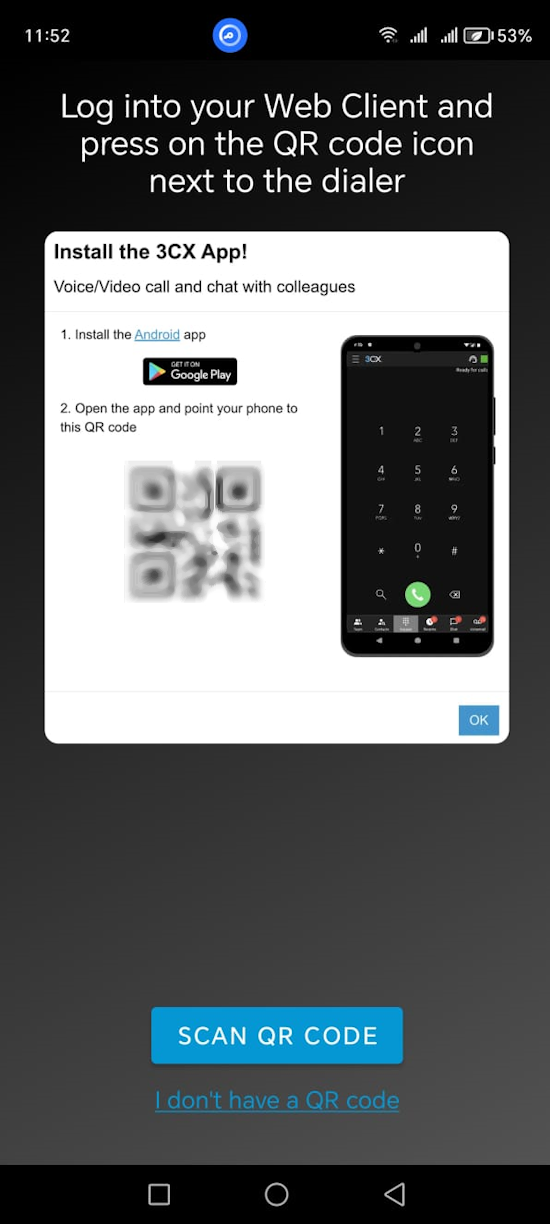
4. Scan QR Code
The QR code is found in your 3CX web client, Alternatively if you are unable to access the web client, contact IT support for the your 3CX QR code.
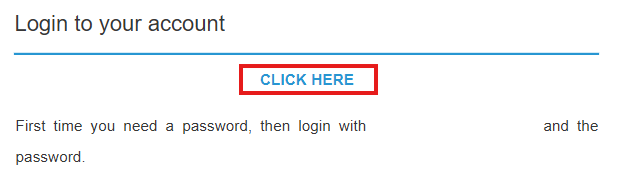
5. Check your Inbox
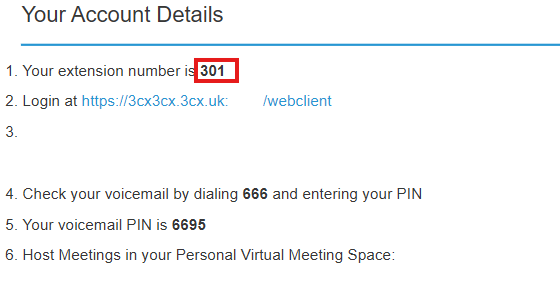
A "Welcome to 3CX" email should have been sent to your email address. Check your inbox for this email. This email contains your extension number and the link to the 3CX Web client - "Click Here" link. Make note of your extension number.
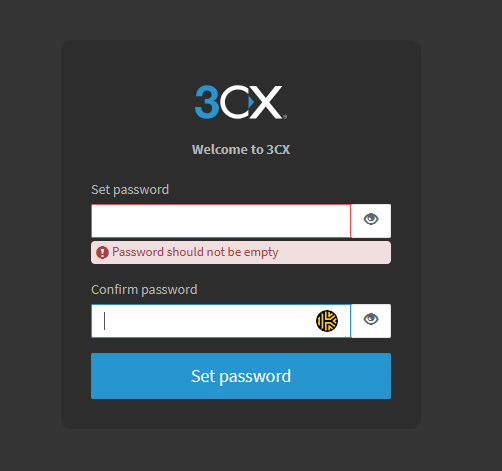
6. Create a new password
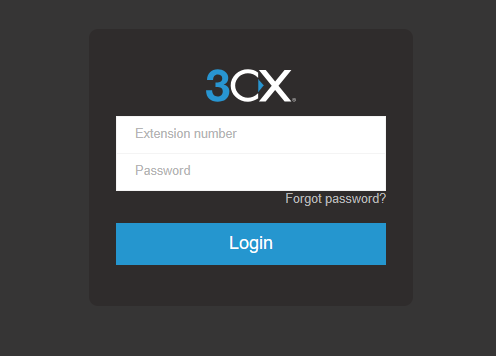
You will be prompted to enter a new password if you have not already used the 3CX Web Client before.
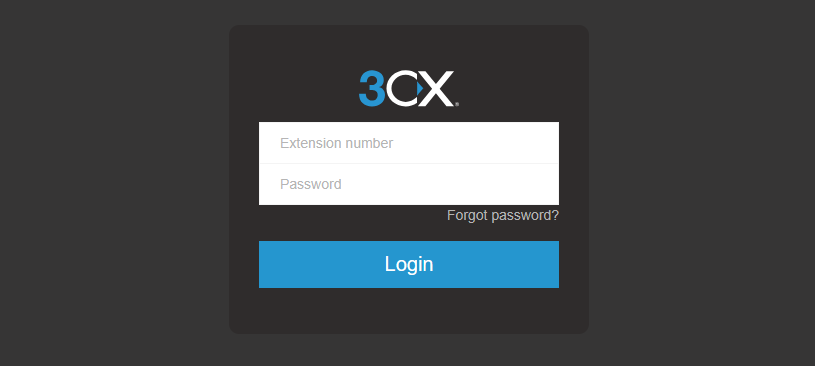
6. Login to 3CX Web Client
Enter you extension number and you password.
6. Go to the Settings
On the left side click the "..." > Settings.
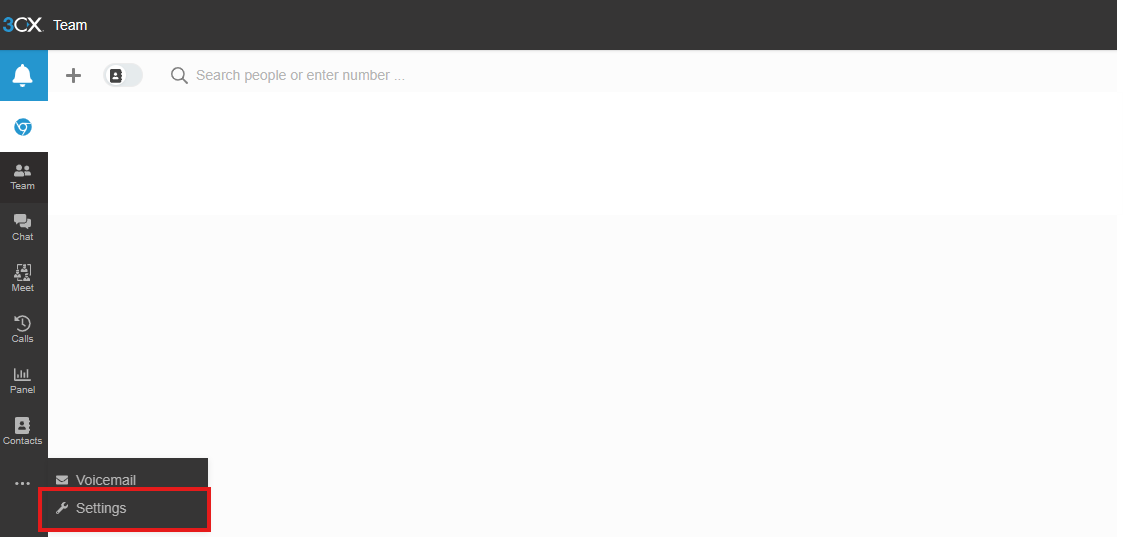
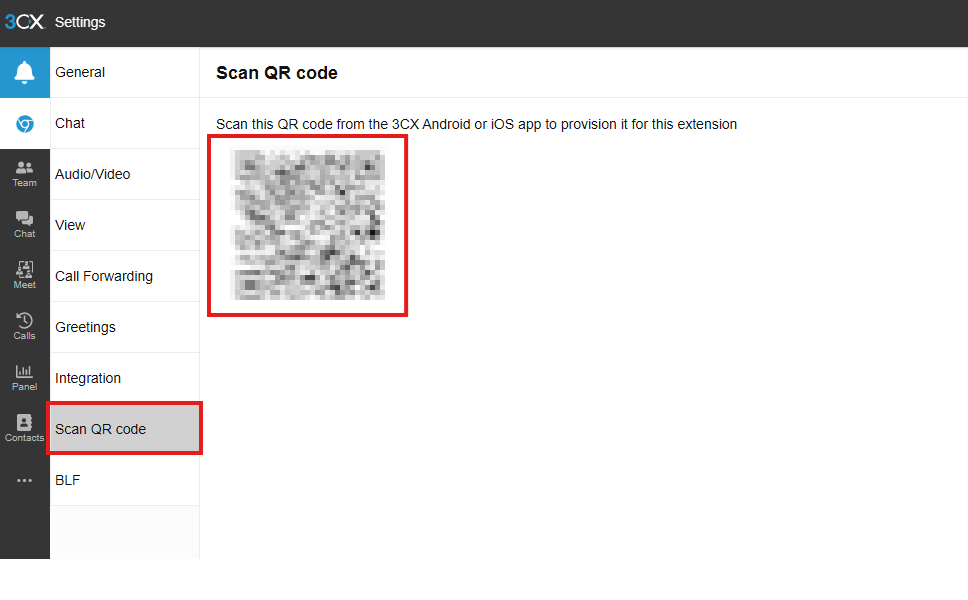
6. Locate Scan QR Code page
Click the scan QR code, the QR Should appear. Use your phone alongside the 3cx Mobile app to scan the code.
6. 3CX Soft Phone
Finally you should be presented with your 3CX Soft Phone.
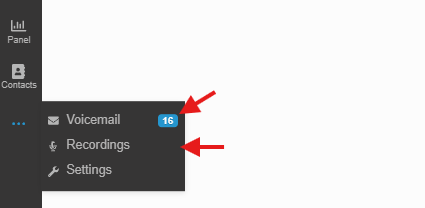
3CX: How to view Recordings & Voicemails
Article shows the steps of viewing recordings and voicemails within the 3CX web app
1. Open the 3CX Web app
Enter your extension number and password
2. Three dots
Click and Open the dots menu

3. Review Recordings and Voicemail
Pick and choose whether you want to look at recordings or voicemails.
SMART ID Printer
SMART ID: How to print an ID Badge
How to print from the IDesigner for SMART ID Printers.
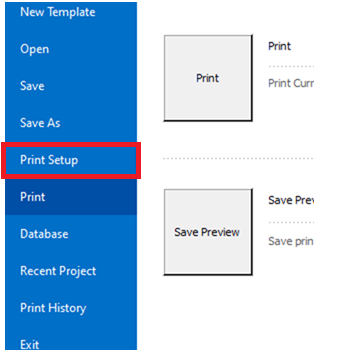
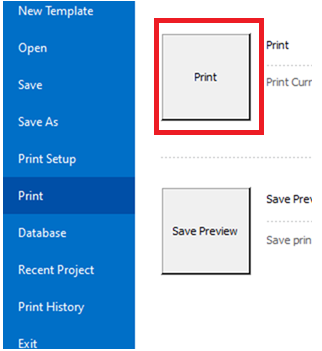
1. Open Print Setup
Top right of the screen click and open the file menu. then click Print setup.
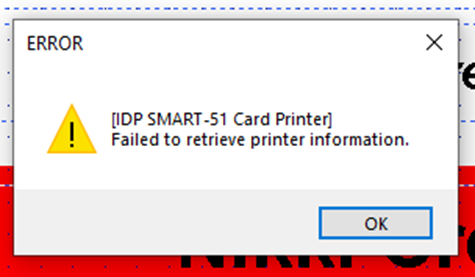
2. Ignore errors
Click okay on the errors until you see the printer setup prompt screen.
3. Set the right orientation
Choose the correct orientation.
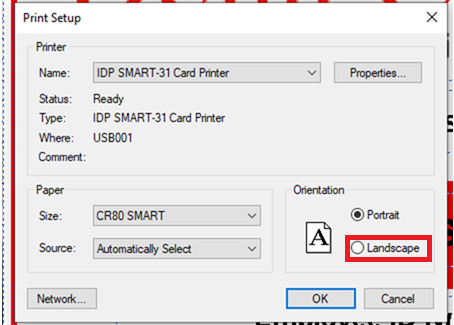
4. Choose the correct printer
From the drop down menu choose the IDP SMART 31 Card Printer, then click okay.

5. Print the Card
Again click on the file menu at the top right of screen. Now choose print menu and click the print button.
Next Cloud
Share, Store & Upload your data
Next Cloud: Sending Large emails
Quick guide for sending large emails.
1. Login to Next Cloud
https://cloud.broadband9.com/index.php/login?clear=1 - Go to this link and login to your Next Cloud account
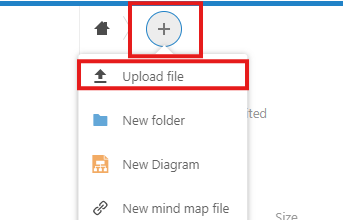
2. Upload a File/Folder
Once logged in, click the plus icon and choose what you want to upload.
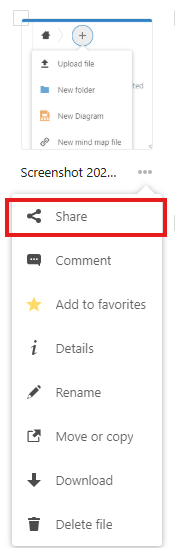
3. Share File/Folder
Once it uploaded, go to All files and find the file/folder you have uploaded.
Next, click the three dots underneath it and click share.
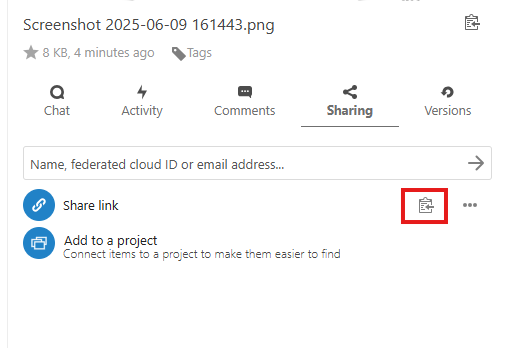
4. Copy Share Link
A similar menu will appear on your screen. Find Share link and click the clipboard icon to copy the link of the file.
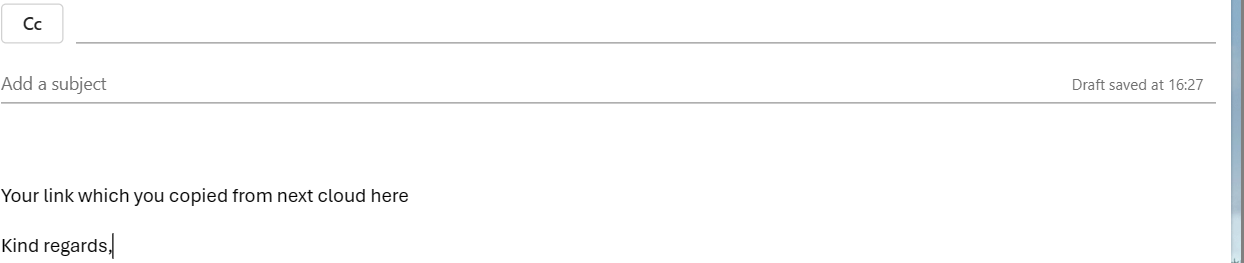
5. Send the file link via Outlook email
Simply paste the link into the body of your email and send the email off.